I thought that I'd share with you how I make these sweet little mitten ornaments. I love the look that they have, a little aged with a dusting of "snow".
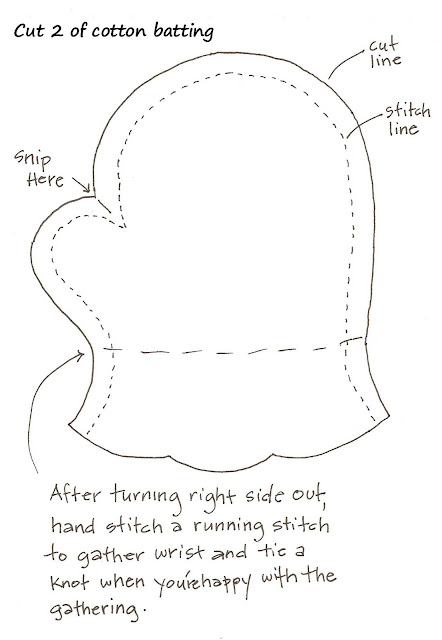
First, I cut the mitten shape from a double layer of cotton batting - it has a beautiful creamy color to it. And then I sew around the outer edge with a 1/4" seam allowance leaving the end open. (You can even hand sew this!)
 Clip the area between the thumb and the mitten close to the stitching. Then turn it right side out. I used pinking shears on the edge of the mitten, too.
For the next step, I threaded my needle and gathered across where the wrist would be and pulled slightly. Then I tied a knot to hold the gathering.

Next, I cut a small length of ribbon and wrapped it around the gathered wrist area and looped it through itself and took a small stitch through it to hold it.

Then I added a snippet of lace on top of the ribbon and took one stitch through it as well.
I added about three vintage buttons, stitching each one on . . .

And tied it off inside the mitten.

You may not choose to do this step, but as you know I love old things so I sprayed some instant coffee onto the mittens to give them an aged look. Don't worry, if you spray too much you can blot with a paper towel to absorb some of the coffee.

Next, I paint little wisps of glue here and there (Elmer's is just fine) and sprinkle clear glitter to give the look of snow.

And last but not least, I will sew on a little loop on the outer top edge of the mitten with button & carpet thread to hang on the Christmas tree!
(This step isn't pictured)
Here is the pattern...simply click on it to enlarge it.
Open it up in your photo editing program on your computer
and there you can size it whatever size you desire!

No comments:
Post a Comment