Wednesday, November 14, 2012

whiten your teeth-- easy and cheaper

The $1 Solution for Whiter Teeth


There are many uses for hydrogen peroxide, it can even fight blemishes. Now, I’ve got another excellent use for this household antiseptic: It whitens teeth!! Safely, that is. I know the name is a little off-putting, (“hydrogen peroxide” doesn’t exactly sound like something you should put in your mouth) but the stuff you pick up at the drugstore comes in 3% form, making it safe to use orally.

Here’s how to use it: Mix two parts hydrogen peroxide with one part water and swish around in your mouth for about 30 seconds (or if you think your gums can handle it, take it straight). Spit it out and proceed to brush your teeth with a whitening toothpaste. That’s pretty much all there is to it!! Don’t be alarmed, though: Once in your mouth, the hydrogen peroxide will begin to foam up. Don’t freak out!

Repeat this every day and you should start to see whiter teeth in about a week. Depending on your teeth you may experience gum irritation or tooth sensitivity, so if either of these occur, discontinue use.

Here’s another great perk of using hydrogen peroxide orally: It helps kill the germs that cause sore throats.

And did I mention it costs about a buck at drugstores?? Winning.

Sunday, November 11, 2012

Wine Bottle Lights


Remember these?


Now that you've enjoyed a lovely bottle of wine or two you can make yourself a bottle lamp. Heres how:


1. Clean your bottle and allow to dry.


2. You'll need a piece of clay to help keep the water from running off-just form a ring barrier around the area you intend to drill.


3. Using your 1/2inch diamond head bit, drill into the reservoir of water the clay allows you to maintain.


(Notice the black plastic holders on each side of the bottle. This is to keep it from rolling off the table)


Be careful during this process the bottle may break if you apply too much pressure, or work too quickly. My first attempt was a success, but bottle number 2 and 3 did not make it.


3. You can sand the edges with sanding paper if desired. Be sure to clean the bottle once again making sure there aren't any little pieces of glass.


4. Now your ready for your christmas lights. You can add between 35-50 lights depending on how big your bottle is. To help manipulate placement of lights use a wire hanger to push the lights into the bottle.

You can find lights at this time of year in the garden section of your everyday department store.


5. Now your ready to add the cord switch. Just follow the directions on the back(you can find these at any hardware store).


Voila! You have a really cool looking lamp, and a great conversation piece at that.

You can top the bottle with your favorite wine stopper or simply use the cork it came with. You can also use a tiny little lamp shade(I attempted to make one my self but I didn't like the way it turned out). The decor for these bad boys are endless.

Candy Bar Stuffed Chocolate Chip Cookies

.
Candy Bar Stuffed Chocolate Chip Cookies
Get a load of these giant cookies! This is yet another fabulous recipe created by Jenny from Picky Palate. You take chocolate chip cookie dough and place a big scoop on the top of your favorite fun size candy bar and place a nice big scoop on the bottom then seal the edges up and bake. The result is a classic buttery, chewy, and perfectly crisp edged chocolate chip cookie with a melty, gooey, and chocolately surprise center!
My candy bars of choice were Snickers, Reese's Peanut Butter Cups, and Milky Ways, but any fun size candy bar would work great, just choose your favorites!
Here's the inside of the Snickers stuffed cookie,
and the inside of the Reese's Peanut Butter Cup cookie,
and finally the Milky Way stuffed cookie, my favorite!

Candy Bar Stuffed Chocolate Chip Cookies: (Picky Palate)
Makes abour 24 large cookies

-2 sticks butter, softened
-1 cup granulated sugar
-3/4 cup brown sugar
-2 large eggs
-1 tablespoon pure vanilla extract
-3 1/2 cups all-purpose flour
-1 teaspoon baking soda
-1/2 teaspoon salt
-10 oz. bag chocolate chips
-variety of fun sized candy bars, about 24

1. Preheat oven to 350 degrees F. In a stand or electric mixer, cream together the butter and sugars until well combined. Add eggs and vanilla until well combined.

2. Place flour, baking soda, and salt in a large bowl; mix and then slowly add to the wet ingredients. Add chocolate chips to combine. Using a cookie scoop, take one scoop of cookie dough and place on top of candy bar. Take another scoop of dough and place on bottom of candy bar. Seal edges together by pressing and cupping in hand until candy is enclosed with dough. Place on parchment or silpat lined baking sheet and bake 9-13, or until cookies are baked to your liking. Let cool for 5 minutes and then transfer to a wire rack to cool completely.

Ho Ho Cake

Hostess "Ho Ho" Cake

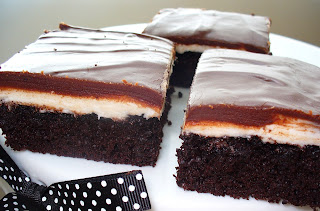
This super easy Hostess "Ho Ho" Cake is a great way to bring back fond childhood memories! Which of these was your favorite hostess snack to get in your lunch? Mine was the Hostess Cupcake, and I think I will just have to make a homemade version of those sometime soon as well!
A moist chocolate cake with a super sweet and creamy vanilla buttercream filling and a chocolate glaze! What is there not to love about this cake? It was a huge hit!
"Ho Ho" Cake: (adapted from How Sweet It Is)

For the cake:
-1 box of your chocolate cake mix, plus the ingredients called for on the box or use your favorite chocolate cake recipe (this is mine)

1. Preheat oven to 350 degrees F. Spray a jelly roll pan with non-stick cooking spray, set aside. Prepare chocolate cake according to package directions. Pour batter into prepared pan and spread around until it's even. Bake for 15-20 minutes.

Remove cake and let cool for 30 minutes. While cake is cooling, prepare the middle layer.
For the middle layer:
-1/2 cup butter, softened
-1/2 cup vegetable shortening
-4 cups powdered sugar
-2-3 tablespoons milk

Cream butter and shortening in a large mixing bowl. Gradually add remaining ingredients and beat until mixture is thick, combined, and spreadable. Spread in an even layer on the chocolate cake. Set in the freezer for 15 minutes while you make the chocolate glaze.

For the chocolate glaze:
-1/2 cup butter
-1/2 cup cocoa powder
-2 cups powdered sugar
-2-4 tablespoons milk

In a medium size pot, melt the butter over medium heat. Add the cocoa powder and whisk until smooth. Remove from heat and mix in the powdered sugar and milk. Remove cake from freezer and evenly frost with the glaze. Store in the refrigerator.

better than crack brownies-to drool for

Better-Than-Crack-Brownies

What else can I say about these fabulous brownies?

I guess the name says it all, although I don't know if they are truly better-than-crack, thank goodness! I really wouldn't know because I would never try crack or any drugs 

But, what I do know is that these brownies are sinful and are full of pure delicious-ness.

You have a fudgy chocolate brownie, topped with chopped up Butterfingers and Reese's Peanut Butter Cups, which then gets topped off with a mixture of melted chocolate chips, butterscotch chips, and peanut butter and then Cocoa Pebbles cereal gets mixed in! Wow, I know, trust me they are gooooood!

These brownies are chewy and fudgy, crunchy and smooth, and chocolatey and peanut buttery! It's like eating a brownie, a candy bar, and a scotcheroo all in one!

I have made these several times and everywhere I take them, they are a huge hit!

Go make these brownies : ), don't wait!

Better-Than-Crack-Brownies: (adapted from How Sweet It Is)

-1 batch brownies for a 13x9-inch pan (boxed or your favorite homemade)
-1/2 cup chopped Butterfingers
-1 cup chopped Reese's Peanut Butter Cups
-3/4 cup milk chocolate chips
-3/4 cup butterscotch chips
-1 1/2 cups creamy peanut butter
-1 1/2 cups Cocoa Pebbles cereal

Make brownies according to directions for a 13x9-inch baking pan. Bake for 20-25 minutes, just so that they are slightly underbaked. Remove and top with chopped Butterfingers and Reese's Peanut Butter Cups, and bake 4-6 minutes more.

While they finish baking, melt chocolate chips, butterscotch chips, and peanut butter together until smooth. Stir in cereal. Remove brownies from oven and evenly pour peanut butter mixture over top.

Refrigerate for 2 hours before serving. I think they taste best cold straight from the refrigerator!

homemade white chocolate peanut butter

I will have more time for baking and blogging and sharing yummy recipes with you!


I never knew that making homemade peanut butter was so easy. All you need is a few simple ingredients and a couple of minutes and you will have whipped yourself up some gourmet peanut butter with endless possibilities! You can basically add anything you want into the peanut butter mixture to create your own peanut butter concoction. You could add honey, melted milk chocolate, melted butterscotch chips, caramel, or may I suggest trying this fabulous looking Cookies and Cream Peanut Butter, from Picky Palate that I want to just dive right into! Doesn't that look delicious?!


This peanut butter is great for dipping apples and pretzals into or slathering on toast and bagels. Try it out and let me know what flavors you come up with!


Homemade White Chocolate Peanut Butter: (How Sweet It Is)

makes about 3/4 cup

  • 1 1/2 cups dry, roasted peanuts (I used salted)
  • 1 teaspoon vanilla extract
  • 1 1/2 tablespoons canola or vegetable oil
  • 1/3 cup white chocolate, melted

Add peanuts to a food processor and blend until a thick nut butter forms. Stream in oil and vanilla with the processor on, continuing to run it until te mixture is smooth-about 3-5 minutes. Turn off processor, add melted chocolate, and turn processor back on. Blend until smooth.


You can keep at room temperature for about a week, but refrigerate if you want to keep it for a few weeks.


S'more Cookie Bars

Happy Memorial Day! I have the perfect treat to kick off the start of summer, S'more Cookie Bars! I love campfire s'mores, but these bars sure step those up a bit! You have HERSHEY'S chocolate bars and marshmallow creme sandwiched between a blondie-like graham cracker cookie bar! You have to let them cool before cutting, but, I think they taste best warmed in the microwave to get the sticky, gooey, and metly effect of a s'more.


S'more Cookie Bars: (Hershey's)


  • 1/2 cup (1 stick) butter or margarine, softened
  • 3/4 cup sugar
  • 1 egg
  • 1 teaspoon vanilla extract
  • 1-1/3 cups all-purpose flour
  • 3/4 cup graham cracker crumbs
  • 1 teaspoon baking powder
  • 1/4 teaspoon salt
  • 4 (1.55 oz. each) or 2 King Size HERSHEY'S Milk Chocolate Bars
  • 1 cup marshmallow creme (I used closer to 1-1/2 cups)

Heat oven to 350 degrees. Line a 8x8-inch baking pan with foil and spray with non-stick cooking spray.


Beat butter and sugar in a large bowl until light and fluffy. Add egg and vanilla; beat well. Stir together flour, graham cracker crumbs, baking powder, and salt; add to butter mixture, beating until blended. Press half of the dough into prepared pan.


Arrange chocolate bars over dough. Spread evenly with marshmallow creme. Scatter bits of remaining dough over marshmallow; carefully press to form a layer.


Bake 30-35 minutes or until lightly browned. Cool completely in pan on wire rack. Cut into bars.