Wednesday, December 19, 2012

Homemade Pedialyte


baby deals

How to make Homemade Pedialyte:

Pedialyte Recipe #1:
Mix salt, sugar and Jello with hot water until dissolved. Stir into 3 1/2 cups of water and serve. Refrigerate up to 3 days.
Pedialyte Recipe #2
  • 4 cups water
  • 1/2 teaspoon baking soda
  • 3 tablespoons sugar or honey (remember that babies can’t have honey until they’re at least 1 year old)
  • 1/2 teaspoon salt
  • optional: 1/2 packet unsweetened Kool-Aid
Mix all ingredients together and serve. Refrigerate up to 3 days
Homemade Pedialyte Recipe #3
Mix all ingredients together and serve. Refrigerate up to 3 days.

Cranberry White Christmas Sangria


I found all kinds of recipes all over the web for White "Christmas" Sangria, even a few videos by Different people, but this is how I made Mine. This turned out a lot better than the first recipe that I was sent by a friend too.

                                                               Picture viafood.com

2 apples, granny smith Sliced
1 Orange sliced
1 heaping cup of fresh cranberries
1 few sprigs of fresh Mint, extra for garnish
1 bottle of your favorite white wine
1/2 cup of white grape juice
1/4 cup of sugar, more for garnish
1 can of club soda or Sprite type Soda works too


Sangria is an easy drink to mix up, it only takes a few ingredients and a little time to mingle the flavors.
You need to chop up the apples and slice the orange, I slightly mash the cranberries
Select a wine that you like best for your tastes, that way you will like the Sangria.

In a large pitcher, combine all of the ingredients.
All your Fruits, sugar, grape juice and soda
Mix it well, so that the sugar fully dissolves.
Bruise your Mint and Add to your pitcher

Place the pitcher in the refrigerator to chill.
Chill for at least an hour, it should be ready to serve.
Simple Tasty and Very festive
Enjoy

Sunday, December 16, 2012

ELF or Doll accents

I found this site for making Elf foods or can be used for Dolls too
and there is a book, which I have on my Amazon wishlist now for future use
It is listed at the bottom of this blog today
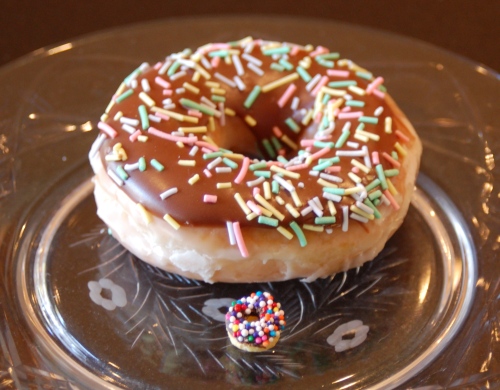
The big boy is from Krispy Kreme. The mini is Emma's version.
 
The big boy is from Krispy Kreme. The mini is Emma's version.


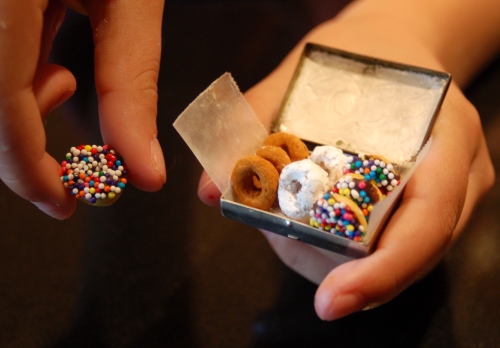
The box of donuts is really a pill box....Emma's holding her favorite, a cheerio dipped in chocolate, then sprinkles. The others are cheerio dipped in confectioners' sugar and cheerios rolled in cinnamon sugar.
The box of donuts is really a pill box....Emma's holding her favorite, a cheerio dipped in chocolate, then sprinkles. The others are cheerios dipped in confectioners' sugar and cheerios rolled in cinnamon sugar.


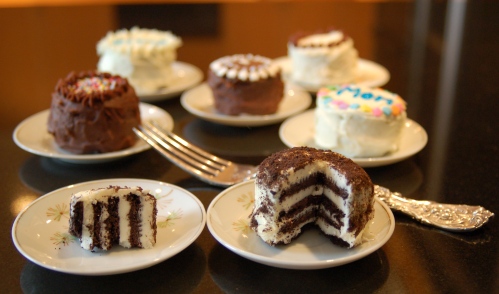
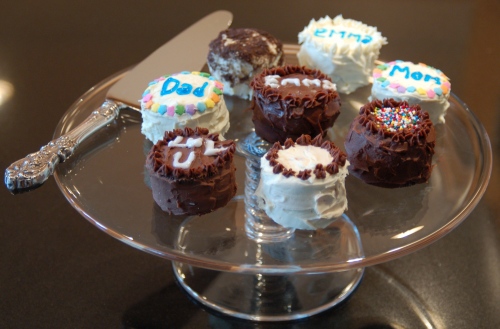
A selection of Emma's mini cakes.


The mini cakes are really oreos with a layer of frosting between them, then more frosting on tops and sides...plus decorations.


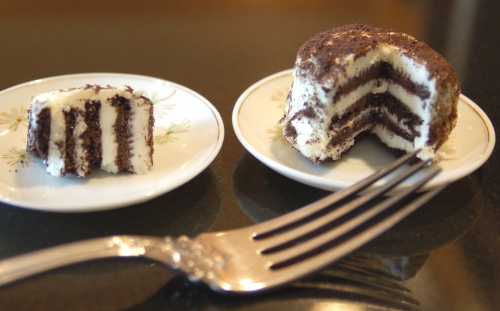
The cakes should "rest" before anyone tries cutting a slice so the oreos have a chance to soften and become, yes, cakelike. Emma used a small pastry tip to make florettes and tubes of colored gels for the lettering.
The cakes should "rest" before anyone tries cutting a slice so the oreos have a chance to soften and become, yes, cake-like. Emma used a small pastry tip to make florettes and tubes of colored gels for the lettering.


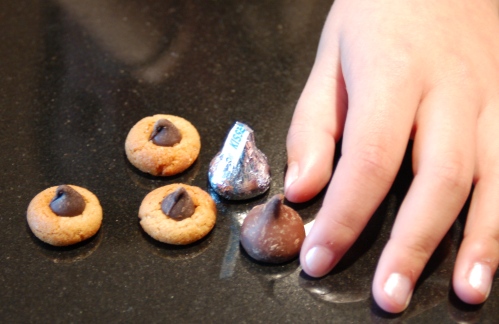
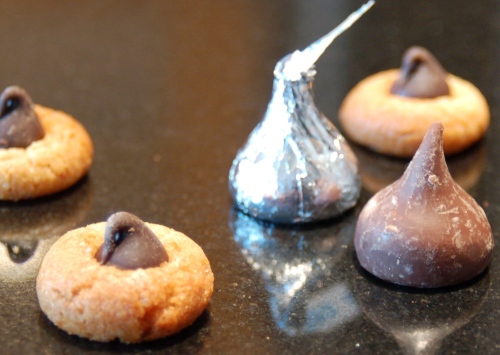
You can see by comparing Emma's hand to these peanut butter thumbprint cookies just how teeny they are.


Emma used store-bought peanut-butter cookie dough and regular-size chocolate chips.
Emma used store-bought peanut-butter cookie dough and regular-size chocolate chips instead of the standard Hershey's Kiss..


This mini cone is really a Bugle and a "scoop" of seasoned cream cheese (you can use a melon ball-er, or just roll in the palm of your hands). Kids like sugared cream cheese and fruit-flavored (think strawberry) cream cheese. Bigger kids enjoy salt-and-white-pepper (vanilla) and smoked-salmon (strawberry) flavors.


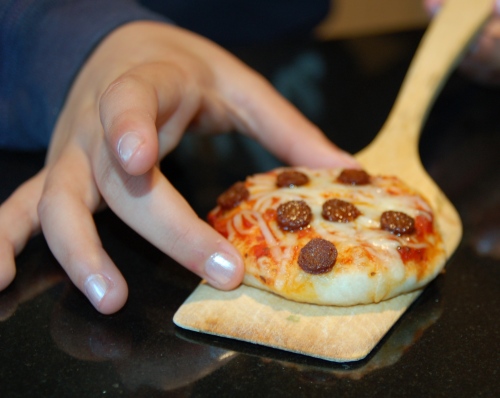
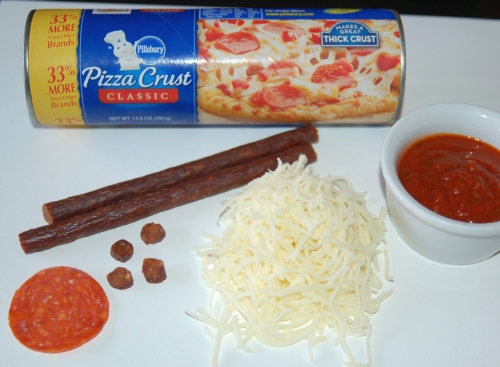
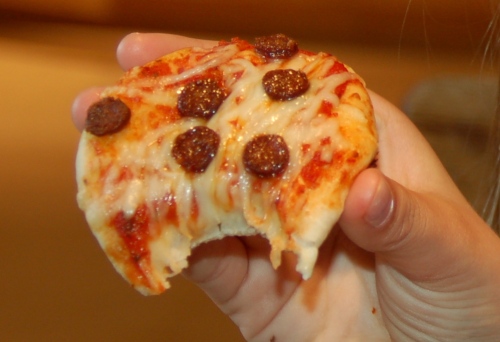
Pizza anyone?
Pizza anyone?


Yup, those are Slim Jim's Emma sliced to make her pepperoni.


Mmmm.
Mmmm.


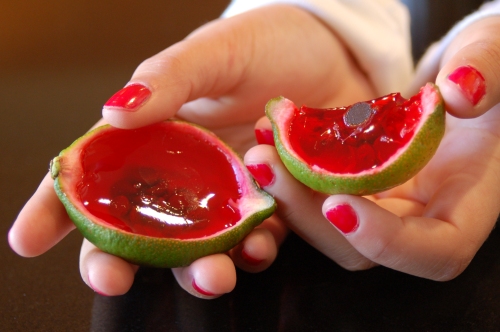
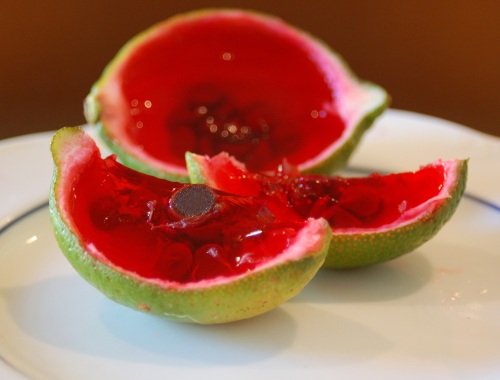
Last but not least: Emma's watermelon--she cuts a lime in half lengthwise, scoops out the pulp, fills with strawberry jello, tosses in a few mini-chips for seeds...and refrigerates until set.


Pretty cute, no? What's your fave?


51dvpemxpcl_sl160_pisitb-sticker-arrow-dptopright12-18_sh30_ou01_aa115_One day, Emma came home from a playdate with her friend Annie with a rectangular take-out soy-sauce dish filled with the mini donuts. I was in love…what a great cooking project! Then, she told me the idea came from an American Girl book, Tiny Treats. We got one immediately, and Emma started making one or two every weekend–get this…instead of TV time!!! That’s just about the best recommendation I can give! I couldn’t even tell you which is my favorite—I think they’re all so adorable. Which is yours?

How To Make a Gingerbread House

How To Make a Gingerbread House


I have made several gingerbread houses over the years there are many patterns and recipes
I found this one on the woodside kitchen and I did try to download the patterns but am waiting on permission, but you can easily draw your own with the dimensions below.


Gingerbread Dough Recipe

makes one 4" by 8" by 7" house

Gingerbread dough must be keep cold so the pieces will retain their shapes. Cover and chill dough for about 2 hours before rolling it out. Any remaining dough can be rerolled to make extra decorations for the yard, trees, stars, or gingerbread men and women.

6 3/4 cups all purpose flour
2 tablespoons ground ginger
1 1/2 teaspoons ground cinnamon
1 1/2 teaspoons baking soda
1 1/2 teaspoons kosher or sea salt
1 1/2 cups vegetable shortening, room temperature
1 1/2 cups sugar
3 eggs
3/4 cup molasses

Sift or whisk together flour, ginger, cinnamon, baking soda, and salt into a medium sized bowl. using the bowl of an electric mixer beat together the shortening and sugar until fluffy. Add eggs one at a time to combine. add molasses and beat until blended. Add the sifted dry ingredients and mix at low speed until the dough forms. Cover and refrigerate for two hours or dough can be made 1 day ahead, keep refrigerated.
 Here are the size dimensions you will need of cardboard for patterns 
2 side walls (each 3 1/2" by 6 1/2"). On one of the side walls cut out a diamond shaped window.

1 front and 1 back wall (each 7 1/2" by 3 1/2") both with window cutouts and 1 with a door.

2 roof pieces (each 4 3/4" by 8")

1 chimney (each 2" by 1 1/4") 2 of the pieces with a 1/2" notch

Rolling and Cutting

Line baking sheets with parchment paper. Remove dough from the refrigerator about 15 minutes before you want to roll. Lightly dust your countertop with flour. Divide the dough into 6 portions, each portion should be rolled so it is 1/4" thick. Keep adding more flour if necessary to keep the dough from sticking to the counter. This will also make it much easier to transfer the pieces to the baking sheets. Using the templates as a guide, cut out shapes with a small knife. Carefully transfer pieces to a baking sheet, chill for 30 minutes prior to baking.

Baking

Preheat oven to 350 degrees. Bake for about 25 minutes until firm. Cool completely on a wire rack.

Choose a 12" square (sturdy) piece of cardboard or wooden board for the base of your gingerbread house. Wrap with tin foil.

Royal Icing

Royal icing is the "glue" that hold the house pieces together and candies in place. There are two ways to make royal icing, one uses egg meringue powder and the other uses raw egg whites. I have included the recipe for both, I use the raw egg white recipe. While you're waiting for the base of the house to set as well as the roof, you need to refrigerate your royal icing. Place your mixing bowl in the refrigerator covered with a wet cloth. Place a plate on top of the cloth. This prevents the icing from drying out.

3 cups icing sugar
2 tablespoons meringue powder
3 tablespoons water

In a medium bowl on medium speed beat above ingredients for about 8-10 minutes, until very thick, a good indication that it is ready is when the icing turns from a glossy white to matte white.

or

2 1/2 cups icing sugar
2 egg whites

In a medium bowl on medium speed beat above ingredients for about 8-10 minutes, until very thick, a good indication that it is ready is when the icing turns from a glossy white to matte white.

Assembly

Use a piping bag or a knife to put icing along both edges of one side wall. Join it to one end of both the front and back walls. Press to create a tight seal. Put icing on both edges of remaining side wall and place together to form the house. Pipe along the inside joints and the base to stabilize. Allow to dry for at least 3 hours.

Roof

Pipe or use a knife to spread a thick line of royal icing on the tops of the side walls. Be generous with the icing for holding the roof in place. Put a thick line of icing along the top edges of both roof pieces to secure. Allow to dry for at least 3 hours.

Chimney and yard

Ice notched chimney pieces and secure to roof. Pipe along edges and fit pieces together to secure. Spread icing all over the tin foil covered base.

Sweet Building Supplies

Before beginning to decorate, separate each type of candy into it's own small bowl.

there are so many ideas for decorations, so get creative

pretzels
hershey's kisses
gum drops
candy canes
jelly beans
licorice
foil wrapped santas. toy soldiers, bells
mini frosted shredded wheat

Chocolate Dipped Almond Shortbread

Chocolate Dipped Almond Shortbread

from the http://woodsidekitchen.blogspot.com/


I usually turn to simple recipes throughout the year, but during the holidays I choose a few recipes that require a bit more time and patience....special treats. Make sure when you're grinding the nuts for the shortbread that you grind them just until they're finely chopped, before they turn into almond butter. If you want to speed up the cooling process of the almonds and get on with making the cookies, just place the bowl in the freezer for a few minutes.

Chocolate Dipped Almond Shortbread

makes 53 cookies

1 cup cold butter, cut into 1/4 inch pieces
1/4 cup icing sugar
1/2 cup brown sugar
1 2/3 cup all purpose flour
1/3 cup cornstarch
1 teaspoon pure vanilla extract
1/2 teaspoon almond extract
1/4 teaspoon sea salt
2 1/2 cups almonds , toasted and finely chopped

6 ounces dark chocolate, chopped and melted

To Toast Nuts

Preheat oven to 350 degrees. Place the oven rack in the center of the oven. Put the almonds on a baking sheet and bake for about 8 minutes, or until lightly browned and fragrant. Transfer to a bowl and let cool completely. Either chop nuts finely with a knife or place the nuts in your food processor and pulse until finely chopped.

Assembling Dough

Line a baking sheet with parchment paper. In the bowl of the food processor combine all the shortbread ingredients except for the chocolate. Gently pulse to combine. Scrape dough onto counter. Gently shape into a ball, it's almost like pastry work (delicate). Divide dough in half, and shape each half into a long rectangular log. Wrap each in plastic and refrigerate until firm, at least 1 hour. To freeze dough, place in a resealable plastic bag and freeze up to 3 months (thaw in refrigerator overnight).

Baking
Preheat oven to 350 degrees. Remove the shortbread from the refrigerator and gently cut with a serrated knife into 1/4 inch pieces. Place on prepared baking sheet. Bake for 10-12 minutes until light golden brown. Remove from oven and let cool on the pan.

Dipping


Once shortbreads cool, dip half of each cookie into the melted chocolate. Transfer back onto the parchment lined baking sheet and let set. Once all the cookies have been dipped in the chocolate, place the baking sheets in the refrigerator for about 10 minutes, or until the chocolate has hardened.

Storage

The cookies will keep in an airtight container in the fridge, between pieces of waxed or parchment paper, or they can be frozen.

the woodside kitchen: Gingerbread Biscotti

the woodside kitchen: Gingerbread Biscotti:  Please go check out her blog, lots of good recipes

Clay Christmas Decorations

Clay Christmas Decorations


This clay is an easy and inexpensive project, so I hope that with the help of my instructions  your decorations will turn out beautifully.

If you want to make coloured clay add food coloring to the water before you mix it with the cornstarch and baking soda. The clay can be sealed in an airtight container and kept in the fridge for a couple of weeks. Just bring it to room temperature before you use it. This recipe can also be doubled to make a larger batch of decorations, work with small amounts at a time and keep the rest covered in a sealed container.

Clay Christmas Decorations

1/2 cup cornstarch
1 cup baking soda
3/4 cup water

Making Clay

In a medium sized pot combine the cornstarch, baking soda, and water. With an adults help the kids can stir this mixture over medium-low heat. You are going to stir this mixture until it is smooth and no longer feels stuck to the bottom of the pot. Stir constantly, after a couple of minutes, the mixture will begin to thicken. When it looks like smooth, thick mashed potatoes, remove the pot from the heat. Spoon the ball of dough into a bowl. Add the leftover bits from the pot to the ball. Cover it with a damp cloth until it's cool.

When the clay has cooled, knead it on a smooth surface dusted with cornstarch. To avoid cracking you need to make sure the clay is well kneaded before rolling. Knead in a little more cornstarch if it feels sticky. Store the clay in a sealed bowl or bag. It will keep for a couple of weeks in the fridge. Bring it to room temperature before you use it.

Rolling, Cutting, and Low Baking

Line the baking sheet with waxed paper if you want to let them dry naturally. Turn them every day to avoid curling. This just takes longer than drying them in a low temperature oven.

Preheat oven to 175 degrees F. Line baking sheet with parchment paper. Roll out clay to 1/4 inch thick on a surface lightly dusted with cornstarch. Use cookie cutters to cut out shapes. Transfer shapes to the prepared baking sheet. Use a straw to poke a hole in the center top of each decoration, then get the kids to blow out the small piece of clay. They love this task! Place them in the oven for about an hour, turning them over halfway through cooking.

More Ideas

I have seen many photos of what people have created using this recipe on pinterest and with links from my comments. This clay can be shaped, rolled, cut, painted and decorated in endless ways. In the comment section alone people have used different painting techniques, glazes, scents, stamps, sparkles, made foot and hand prints....it's wonderful to see the creativity.

1. Paint or decorate them and thread a piece of ribbon, twine or yarn through the holes.

2. Use cookie cutters for different special days, leaves for fall, or hearts for Valentine's day.

3. Make a few ornaments that can be used to make a mobile or to attach to a wreath.

4. Attach a magnet to the back of a clay shape and stick it on the fridge.

5. Roll small bits of clay in the palm of your hand to make beads. Roll tiny beads between your fingers and thumb. Use a toothpick to poke in holes.

6.you can paint with strong food colouring and then give them a final coat with white glue. Undiluted glue gives a thick clear glossy finish and makes the colours more vibrant, but you could water it down to a 50/50 consistency.