How to Grow Perfect Tomatoes
How to start tomatoes from seed, transplant tomato seedlings to your garden, condition the soil, the best supports for tomatoes and the essentials of mulching.
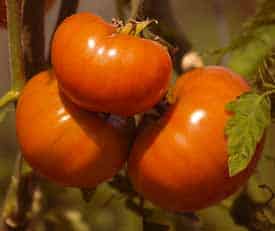
Tomatoes ripening on the vine in my organicvegetable garden
Hands down the most popular garden vegetable in the world is the tomato. It’s estimated that there are about 7500 varieties, from the Arkansas Traveler to the Zorba, in a multitude of shapes, sizes and flavors. Sometomatoes are open pollinated (OP) heirlooms whose seeds can be saved and passed down through generations; others are hybrids (F1) whose seeds, unlike heirlooms, won’t necessarily express the same traits of the parent plants.
The “perfect tomato” is literally a matter of taste – one person’s Beefsteak is another’s Cherokee Purple. The climate in your region will play a significant role in which tomatoes grow with abandon and which bear only modest fruit.
Many techniques, tips and tricks for growing tomatoes are handed down generation to generation. Every gardener has the method they swear by, but regardless of climate, cultivar and whether it’s determinate (bush-type) or indeterminate (vine-type), these guidelines will get you on your way to growing perfect tomatoes.
Know the last frost date for your area
Frost kills tomatoes, so knowing your last frost date is critical. See my post on how to find your first and last frost dates, or find it at the NOAA satellite and information service.
Think of the last frost date as your line in the sand. It’s the date after which you’ll plant seedlings. Where I live in Pennsylvania, the last potential frost date is May 14 and I rarely plant tomatoes before then, unless the spring is unusually warm. The tables are remarkably accurate-last year, the last frost in my area was only a few days prior to the 14th.
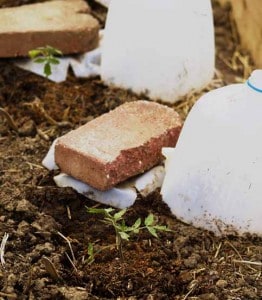
Tomato seedlings set out early are covered by milk jugs, which protect them from frost, cold nights and hungry rabbits
If you’re tempted by early warm weather to plant before the last frost date, make sure that seedlings are covered at night with plastic milk jugs, because even without a frost, cold nights and cool days can wreak havoc on exposed tomato seedlings. Gardeners using row covers or garden tunnels can plant weeks earlier, as the covers keep frost off the seedlings and add roughly ten degrees to air temperature inside the tunnel.
Starting tomatoes from seed
If you want to grow tomatoes from seed, start them indoors eight weeks before your last frost date. Tomato seeds germinate best in starter pots warmed with a heat mat, but they’ll also germinate at room temperature, but may take two or three days longer.
I start seeds in 4″ square or round peat or plastic pots, because I have the best results when seedlings stay in the same pot from germination to transplant. Not having to transfer seedlings from seed trays to pots minimizes stress on the roots, which can disrupt growth or damage the plant.
Sow 2 or 3 seeds in each pot and cover with 1/2″ of additional potting medium. Moisten the top of the starter mix with a spray mist bottle, then cover the pots with a sheet of clear plastic or a clear plastic dome to create agreenhouse effect.
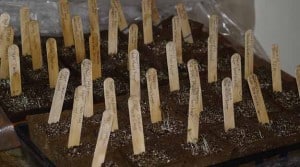
Starting tomato seeds in fiber pots
Keep pots covered with plastic until seeds germinate in six to eight days, then remove the plastic to prevent mold or fungal infection. Water as needed, but don’t allow the soil surface to become dry.
When seed lings are about two inches, select the healthiest in each pot and snip off the unwanted seedlings with a garden snip or very sharp scissors. Do not pull unwanted plants from pots, as it may disturb the root zone of the seedling you wish to keep. Tomato seedlings need lots of light from this point forward, so move pots under grow lights.
Transplanting tomato seedlings
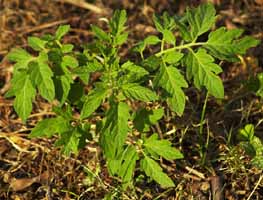
tomato seedling at about ten weeks
Plant seedlings in your garden bed on a cloudy day after your last frost date – cloud cover helps the seedling to adjust to sunlight and avoids early sun scald. But first, harden them off outdoors one week prior to planting, so they can adjust to night and day temperature fluctuations. A covered porch which receives morning sun and afternoon shade is ideal.
Plant seedlings so at least four inches of the plant’s stem is buried in soil. This encourages deep rooting, which will protect your seedlings during a drought or heat wave. Tomatoes can actually create additional roots from any part of the stem buried in soil.
If you’re supporting your plants with a tomato cage, wooden stake, or other device, plant the seedlings 15 inches apart in a straight row down yourraised garden bed. If you will not be supporting your plants, allow 24 inches for determinate varieties and 36 inches for indeterminate varieties.
Soil and fertilizer
Tomatoes prefer soil that is light, with lots of organic matter and a pH range of 5.8-7.0. I mix lots of tree leaves into the bed in fall, compost in early spring, compost around the plants after transplanting and then twice more throughout the season. Supplement the compost and leaves with a feeding of fish emulsion or liquid seaweed every two to three weeks.
Mulching tomatoes
Use grass clippings, straw, pine mulch or pine bark to mulch tomato seedlings immediately after transplanting, and maintain mulch levels throughout the growing season. Mulch should be two to three inches deep and come to within one inch of the stem. This keeps roots well insulated in case of a heat wave, suppresses weeds, and helps to maintain adequate moisture levels. Keeping the mulch away from the stem helps prevent fungal buildup from excess moisture.
Supporting indeterminate tomatoes
Indeterminate (vine) tomatoes will grow just fine without support, but you’ll lose a lot of fruit to soil-borne pests and moisture. Get the fruit in the air.
In my experience, a tomato cage is useful for bush varieties, but useless for the long vines of indeterminate plants. Late in the season, when the plant is producing copious amounts of tomatoes, the vine will grow over the top of the cage and down the other side, creating a pinch in the vine, which restricts fruit development. To avoid this, “cap” the top of the plant with pruners when it reaches the top of the cage.
Wooden garden stakes are the tried and true, best means of support for tomatoes in a backyard garden. Tie the vine to the stakes as necessary with short pieces of fabric (wire ties cut into the stems). Make sure that you plant the stake at the same time you plant the seedling – this avoids root damage down the road. Trellising and training tomato vines overhead are quite effective as well, and are the preferred methods of commercial growers. Overhead support allows the vine to climb, but proper pruning with these methods is absolutely necessary and best left to experienced hands
Pruning tomato plants
As mentioned in part 1, pruning tomatoes of the determinate (bush) variety is usually not necessary. However, you may wish to do so during wet and cool summers in order to increase air circulation around the tomato plants to prevent fungal infections. With indeterminate (vine) cultivars, pruning is necessary to insure an excellent crop.
Start pruning tomato vines about three weeks after you’ve planted seedlings outdoors. Remove all suckers as they develop so that all of the growth is on one main stem. Suckers are the stem outgrowths that appear in the crotch of each leaf – they don’t bear fruit, so the plant is wasting energy if it continues to feed this growth.
If you’re supporting the tomato vines with wooden stakes, top off the plant once it reaches the top of the stake, so the vine doesn’t outgrow its support. Use fabric to tie the vine to the wooden stake to avoid cutting into the stems and always tie-in loosely to allow for growth.
Weather
The climate in your area, even the micro climate in your garden is a significant factor in how much fruit your tomato plantswill produce. Tomatoes are originally native to the coastal areas of south america and they thrive under similar weather conditions: dry air and temps in the 80-85 degree range. During wet and cool summers however, tomato blight and other fungal infections can be frequent and widespread, which sometimes result in a complete loss of plants and fruit. Early heatwaves, with temps in the 90+ range when the plants are young, slows growth and reduces fruit set. Row covers can be effective in protecting your seedlings in either of these situations.

A watering can like this one from Fiskars should be used to water your tomatoes at soil level – not overhead
Watering tomato plants

Tomatoes should only be watered around their root zones. Don’t water from overhead with a hose or sprinkler, as the moisture left on the leaves and fruit may lead to fungal infections. In the absence of rainfall, water your plants deeply once a week and more often if needed during heat waves. How much is enough? Your hand is a great moisture meter – stick your index finger into the ground up to the middle knuckle. The ground should feel wet the entire length, but not saturated.
Tomatoes should only be watered around their root zones. Don’t water from overhead with a hose or sprinkler, as the moisture left on the leaves and fruit may lead to fungal infections. In the absence of rainfall, water your plants deeply once a week and more often if needed during heat waves. How much is enough? Your hand is a great moisture meter – stick your index finger into the ground up to the middle knuckle. The ground should feel wet the entire length, but not saturated.
Tomatoes need consistent moisture when fruit is on the vine to avoid cracking and blossom end rot. Both conditions may appear on the fruit after a long period of dry, intense heat followed by a heavy rain. Keep tomatoes well watered during dry conditions to avoid this.
Share the raised beds
Tomatoes like the company of basil, parsley, bush beans, mint, nasturtium, marigolds, garlic, and leafy vegetables. The herbs and flowers attract beneficial insects that prey on tomato pests and the leafy vegetables love the shade that tomato plants provide when summer is at its most extreme. The herbs should also keep rabbits from making a home in the cool shade of mature plants – supposedly they hate the smell.
Harvesting tomatoes
For indeterminate tomatoes, harvesting will start with the first ripe tomato and continue through frost. Determinate tomatoes will for the most part ripen within a period of a few weeks and then the plant will begin to brown and fade away.
It’s pretty easy to tell when your tomatoes are ready to be picked. They’ll be firm (but not hard) to the touch, have a nice mature color, and can be pulled from the stem with a gentle tug. If you have to work hard to pull it off, it’s not ready. As the date of your first frost draws near, harvest the green tomatoes which have no chance of ripening and bring them inside. Let the plant direct all of its energy into the more mature tomatoes which have a better chance to ripen before Jack Frost visits.
Saving Tomato Seeds
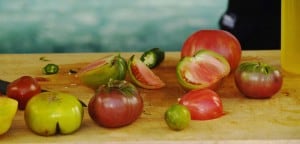 Tomato seeds are one of the easiest seeds to save – just witness the thousands of heirloom tomato seeds passed down through generations. The process is pretty simple, according to Marc Rogers in Saving Seeds: The Gardener’s Guide to Growing and Storing Vegetable and Flower Seeds:
Let the first cluster of tomatoes ripen completely, then pick the best of the best to save. Cut the tomato in half vertically and scoop out the seeds and pulp. Place seeds and pulp in a mason jar with a small amount of water and shake gently. Leave to sit two to four days, shaking occasionally, until the tomato seeds sink to the bottom of the jar. Add more water and shake again to separate and clean the seeds.
Remove the tomato seeds from the jar and allow to air dry on a paper towel. When the seeds are fully dry, store them in a white envelope inside a mason jar and keep cool until next season, preferably in the back of your refrigerator, but never let the seeds freeze. Make sure you mark the envelope with the tomato cultivar and the date harvested and any other information you might find useful.
It is not advisable to save seeds from hybrid (F1) tomatoes, as the fruit which comes from them may not resemble the fruit of the parent plants.
Keeping Tomatoes
Do not store fresh garden tomatoes in the refrigerator, as they lose flavor quickly – they’re best held at room temperature. If your harvest exceeds the amount which you can eat before they go bad, there are a few ways to store tomatoes for later use.
Freezing is quite good. Par-boil them, score the skin when hot, peel, and then put them in a freezer container (preferably glass). This is fantastic if you make a lot of sauces over the winter. You can also freeze the tomatoes whole. I find freezing to be the the simplest and fastest method if you have the space and are not subject to frequent electrical outages. Of course, if you have enough tomatoes, you can make a vat of sauce right away and freeze that for your winter pasta dishes.
Other ways of keeping tomatoes are by freeze drying, which makes a wonderful winter treat or by canning tomatoes for use over the winter.
For more gardening tips check out http://www.bigblogofgardening.com
***************************************************
Problems with your tomatoes? Here are a few tips
***************************************************
Problems with your tomatoes? Here are a few tips
As certain as the heat and humidity of summer are the questions about tomato problems.
So far, I have not seen tomato late blight, although it has been reported in a few areas of the mid-Atlantic region. But blossom end rot and tomato leaf roll have made their annual appearance in home gardens.
Blossom end rot
Blossom end rot (BER) is not a disease, but the result of insufficient calcium in the plant when the fruit is developing. The lack of calcium in the plant causes the blossom end (opposite the stem) of the fruit to become dark brown, leathery and sunken.
Although there is usually enough calcium in the soil, roots may be unable to absorb it for a variety of reasons. Drastic moisture fluctuations in the soil, the result of too much or too little rainfall; high temperatures; excessive nitrogen fertilization; rapid plant growth; or damage to the roots due to cultivation, are all possible causes for inadequate calcium uptake.
The solution is to make sure that you supply an adequate amount of moisture to the plant — about 1 inch per week — during the growing season. Drip irrigation and straw or plastic mulch will help you ensure even moisture to the plant.
Unfortunately, you can’t do much about excessive rainfall.
The results of a soil test will give you the proper amounts and kinds of fertilizer to use on your tomatoes. When the flowers and fruit start developing, use a fertilizer designed for tomatoes to ensure adequate levels of phosphorus and potassium, both important for fruit production; the first number in the fertilizer ratio (nitrogen) should be low compared to the last two numbers.
For a quick fix, you can put 1-2 tablespoons of hydrated lime over the root zone and water it in thoroughly. You can also try a calcium spray applied to the foliage (not the fruit). It’s important to follow the label directions, as you can burn the foliage if you apply too much or too often; the calcium spray won’t correct affected fruit, but it may help to prevent BER on fruit just beginning to develop.
Tomatoes affected by BER won’t recover; removing them from the plant when you first notice BER may help later-maturing fruit from developing the same problem. BER can also happen to peppers and eggplant.
Tomato leaf roll
Tomato leaf roll is usually seen on older leaves. The leaflets curl up lengthwise, sometimes into a very tight roll, and they often become thick and leathery as well. Although you may find an insect or spider hiding in that rolled up leaflet, the critter is not the cause of the problem, nor is this a disease.
Leaf roll is a physiological condition, a functional response of the plant to some stress factor, and it is worse in certain tomato varieties than in others. The plant senses it is losing more moisture through the leaves than can be replaced through the roots, so it tries to compensate by rolling the leaves and making them thicker to reduce water loss.
Stress factors that can lead to leaf roll include heavy pruning, excessive fertilizer, cultivating too close to the roots, saturated soil after a heavy rain or any sudden change in weather. It often happens when mild, rainy spring weather transitions to hot, dry summer weather, and the plant’s top growth has outstripped root formation.
Fortunately, leaf roll is not something you need to worry about, as it does not affect growth or yield, and will often correct itself when conditions become more favorable. To minimize leaf roll on tomatoes, use mulch to keep the soil at more even temperature and moisture levels; don’t damage the roots by cultivating or hoeing too close to the plants; and water well to keep the soil moist, but don’t overwater so it stays saturated — the soil needs to dry out slightly between waterings.
No comments:
Post a Comment