Showing posts with label Sewing. Show all posts

Saturday, May 29, 2021

How to Clean Stains out of Fabrics

 A while ago I was asked to do some alterations on a wedding dress, when I got the dress it was badly stained. I wasn't asked to clean it, but I knew I had to help. So I did the alterations and when I completed my work I decided to give the dress a good cleaning as I knew taking it to the cleaners was not only going to be expensive but the price would be too high.

#savethedress #cleaningfabric #restoredgarmet #howtoclean

So I got out my tub of oxi clean, I would be without it. No this is NOT A COMMERCIAL for the product but I am a believer on how good this stuff works. You can buy it at any grocery store or other stores such as Lowe's Home Depot, even Walmart if you must. 


Next I took the dress into the bathroom to the tub, got the water very HOT
Filled the tube enough to submerge the dress.
Mixed my Oxi Clean into the tub.

I placed the dress into the tub of very HOT water
and proceeded to rub the stains
Then I let it soak 30 minutes
more gentle rubbing on stains
turned the dress and soaked an hour.
Again I rubbed the stains and could see much improvement
This is an answer to many problems. rubbing soaking in Oxi Clean and soaking more.
In as hot of water as possible.
Here are results
From the first look at this it seems impossible to get clean
it went from this 
to this
one tiny spot on the very bottom

The train was badly stained underneath too


The veil had seen better days as well
but saving an heirloom is important

Just needed a good steam pressing before the wedding here.
This dress turned out to be absolutely beautiful
restored to perfection
the customer was amazed and very surprised
also she was speechless and very appreciative to my extra work and success at cleaning this beautiful dress for her wedding day.

Using OXI CLEAN to clean fabrics is very beneficial and money saving not to mention how it can bring heirloom pieces back to life and restoration.
**It is advised to test on a piece of the fabric before doing the entire garment
to both see if hot water is safe and this cleaner**
I have had great success with several items.


Wednesday, January 6, 2016

Fabric Mermaid and Fish Blankets


Hey there,
Happy New Year, I hope you are keeping warm and having a good new year.
I have been hearing from some of my grand daughters that they want a mermaid blanket
so after doing some research and design I have come up with this design and made them.
They turn out so cute, then I decided to make a doll blanket to go with it for 18" dolls like the American Girl dolls. You can use them for other dolls too.
I also make boys Fish Blankets too.
I made my blanket with tucks in the sides so there is room for the girls to move their feet and they are long enough so they will fit a few years, also I make smaller ones for toddlers and larger ones for adults. because I knew mommy and even grandma's would like these.
Can be Mermaids or Fish Blankets Order yours today
You can order yours today in several color combinations just email here for your order or find them on facebook here where you can order them

TWO MORE SETS
I just am adding two more cute sets for 2 very adorable little girls, they were so happy to get these they are dragging them around with them as they play, and their dollies are very happy too.


Wednesday, January 8, 2014

Crafting for January-Signs, Blankets and More

What Have I been doing since taking the Christmas Tree and Decorations down? Besides rearranging things I have jumped into new projects.


I have been busy Painting Gardens Signs and what fun I have Painting, A customer asked me paint on some old boards and so I got creative
10 Signs
These were really inspiring and a lot of fun, I have loved to Paint since I was a kid and took every art class I could
These are going to look so good in People's Yards aren't they, More on the way

Then I had to turn on the sewing machine and sew up another Car seat Cover/Blanket 
Here is another one I did for My Grand daughter who was just born Recently
On November 1, 2013
This is how it looks over the car seat

Then to go with it I decided to Make a couple Taggie Blankets for Baby

We have a thing for Owls this year too!!
They are adorable


Another Taggie Blanket I made for Baby Abby
So a lot of Crafting for the beginning of 2014
Onto More Projects
Questions? Orders are accepted, Email me
mscheriluv@hotmail.com
 Car Seat Covers/Blankets start at $40.00
Taggie Blankets start at $15.00
Hand Painted Signs start at $25.00


Friday, November 15, 2013

My Grand daughter's Special Dress

I am a proud new Grandma again, My daughter has had their newest family member Abby was born November 1, 2013, she is just a little bitty baby. SO beautiful just like her Mommy and her Grandma :)~

She is very tiny, so newborn clothes doesn't fit yet, and when my daughter went shopping for a Dedication(baptism) Dress, she couldn't find one she liked so I went to work. She wasn't a premie but she looks like one.

I took this pattern, it comes in XXS-XL sizes, but even the XXS was too big, so I cut it down some to fit her tiny measurements

I made a few alterations, including down sizing to shall we say XXXS
and shortened it several inches because Mommy wanted a shorter dress
Next we picked out some trims in the color that my daughter wanted for Abby
These will be so pretty on her dress.

So after sewing the skirt back and front together, I sew the hem and then add the bottom trims

Then I put the trim on the dress front bodice 
Then next I trim the sleeves of the dress
Next I sew the bodice and sleeves all together and the lining of the bodice 
Last I add the skirt buttonholes and buttons
A ribbon for the waist if she likes it and she will be the princess she was born to be.
Here is the finished dress
Isn't it just beautiful
Oh did I mention I have sewn professionally now for many years.

I love her so much and so does all her family
She also has a beautiful sister who is 2 1/2 
Yes I am a proud Grandma

Thursday, October 24, 2013

Fall Crafting Decor I enjoy making and selling

I have been busy crafting Pumpkins and Scarecrows and having lots of fun.
I have several for sale, and I will ship anywhere in the US, these also make nice gifts
You can use them anywhere to add a festive fall Touch to your home.

I think they are just too cute, don't you?


and take a look at this guy, he's a great door greeter
You can order yours today, custom colors to match your tastes available
Check out my fb Page too
order your handmade sewing and crafts today
email me

Friday, August 16, 2013

Potpourri Sachet Ornaments


Found this somewhere awhile back and I was thinking they would make beautiful potpourri sachets as well as ornaments. You could do them for Christmas but also would be good as gifts for bathrooms and bedroom scented decorations, don't you agree?


No Sew Quilted ChristmasOrnament


You will need:

Three toning fabrics
Pins... lots of pins as these are our secret weapon
Rotary cutter, ruler and mat
3" polystyrene ball
Ribbon

Cut your fabric into 3" squares, 8 squares for the top of your ball and then two lots of 16 for the second and third row. Split into two piles of four top squares and eight each of the other fabrics.

Now I believe you did not know that you could press fabric with your fingers? Well that is what we are going to do next, we need to find the centre point of the square, you can do this by just folding the fabric in half along each side or if you are feeling flash across the diagonal.
Determine where the top of your ball is, put a pin in the centre of the wrong side of your fabric and stab it into the top of your ball.

Fold it into a triangle (your pin will be in the centre of its longest side), pin the top of the triangle down

Now fold over the left point and then the right into centre and pin it down to create a diamond shape, pin the each of the sides into the ball.

Repeat it three more times to create a square.

For the next layer, pin the first triangle 5/8" down and in between your diamonds...

I used the end of a tape measure to place the pin, repeat the folds as you did for the first layer for four diamonds. Now if you are frugal like me, you will notice that often diamonds overlap so capture two sides with one pin.

Now, we are going to in fill between these diamonds by putting the pin in between the fold of the first row of diamonds and working the diamonds as you did before... if your fingers are feeling a bit sore then use a thimble to help you press the pins home, especially when you are working through so many layers of fabric.

On the third layer, I decided that rather than make each layer the same size, I would use the second row, just to outline a star. For the third row, you repeat what you did for the second row but instead of coming down 5/8" just come down 1/4".

When you have completed the top half, turn the ball over and repeat the steps above, to make sure that the halves match, align your first quarter fold with the folds of the completed half.

Trim the excess fabric from around the centre of the ball. I realise it looks rather grim at this point but we are going to hide it all under a ribbon.

I used two lots of ribbon, a satin ribbon to cover the exposed edges and some Jane Means grosgrain ribbon to accent my decoration. (BTW, Jane has recently started her own blog, which is well worth a peek) Start by creating a loop from which you will hang your dec. Take your satin ribbon, pin it into the ball run the ribbon around the ball.

Do not pin the end of the satin ribbon down yet, instead take the loop from which you will hang the ball and pin it across the satin ribbon. Next place the end of the satin ribbon to cover the base of the loop, fold the end underneath to give you a neat finish and pin the end in place with four pins at each corner to make sure that the loop is held securely in place and will not bounce off your tree :)

Next tie a bow... and now I admit it, I lied to you, you are going to need to stitch the bow onto the loop, but if you are really stitch phobic, you can use a glue gun to stick it onto the loop.

And there you have it, your very own quilted Christmas star... that was so technically difficult to make!


Saturday, June 29, 2013

DIY:Make a Pillowcase Dress

Pillowcase dresses are in demand everyone is buying them, making them or selling them. 
So here are some easy instructions to make them for your little girls.

I did buy some pillowcase patterns from McCall's and Simplicity and you can go buy them too, they did come with some applique patterns as well that are cute
Then someone sent me this pattern so I am sharing
The pattern was free 
I have made several of these pretty summer dresses
I also can make you one, after all who wants to wear ready made everyday when you can wear one of a kind designs.
All my designs are unique handmade with love
YOU Can ORDER Your Pillow Case Dress from Me by emailing me
mscheriluv@hotmail.com for more information on prices

these are 2 of my very beautiful grand baby girls
THEY ARE ADORABLE
Yes I am a very proud grandma
Here is another set of dresses in an Aztec and yellow design


You will need some pretty fabric 44/45”-wide pick something your little girl likes
1 yard print or solid for body of dress
3/8 yard contrasting print or solid for the bottom band
1 package single-fold bias tape, in a color that matches
or contrasts with the dress or bottom band fabric
3 yards 3/4”-wide ribbon for ties
Optional: 1 1/2 yards rickrack or other fun trim

Instructions:
1. Launder the fabrics to remove finishes and allow for
shrinkage. Press to remove wrinkles. Fold each piece
in half with selvages aligned and smooth out any
wrinkles.
2. Cutting across the
contrasting fabric, cut
and 8 3/4”-wide strip for
the bottom band. With
right sides facing, pin and
stitch the contrast strip to
one edge of the pillowcase
panel. Use a 1/4”-wide seam
allowance. Serge- or zigzag
finish the seam allowance
and press it toward the
contrast band.
3. With right sides facing,
stitch 1/2” from the selvage
edges to make a fabric
tube. Press the seam open,
using the selvages as the
seam allowance—or trim
to 1/4” and serge or zigzag
both seam allowance
together and press the seam
allowances to one side.
Figure 1.
4. Turn the fabric tube right side out and press gently
along the seam-line. Place on your cutting table.
5. Measure the child who will wear the dress from
the middle of the front edge of her shoulder to the
desired finished length.
6. Fold the banded fabric panel in half lengthwise.
Beginning 4” below the band seam, measure up the
length determined in step 3 and cut away the excess
fabric. Figure 2. The excess band will be turned to the
inside and stitched later and the upper edge will be
finished with a casing
7. Fold the tube in half lengthwise with the upper raw
edges aligned. Cut an armhole as shown. Also cut a
gentle curve at the upper edge for the neckline.

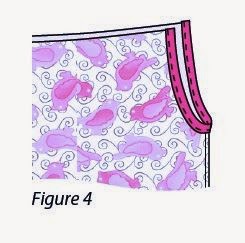
8. Bind the armhole edges with contrasting bias tape.

9. For the upper-edge casing, measure one upper cut
edge of the dress and add 1”. Cut (2) 1 3/4”-wide true bias
strips that length from fabric leftovers or other
fabric scraps in your stash.
10. Turn under and press 1/2” on one long edge of each
piece of bias. With right sides facing and long raw
edges even, stitch a bias strip to each neckline,
allowing half of the excess length to extend at each
end. Use a 1/4”-wide seam allowance and press the
seam allowance toward the bias.

11. Under-stitch through all layers close to the seam-line
to make it easy to turn and press the casing. Turn in
the excess at each end and press. Stitch 1/4” from the
short folded ends and trim excess bias close to the
stitching.

12. Turn the casing to the inside and press. Stitch the
folded edge in place to finish the casing on the front
and back of the dress.

13. Cut the ribbon into 2 equal lengths and thread
each one through a casing to tie in bows over each
shoulder. Trim the ribbon ends at an angle to prevent
raveling.
Note: If you prefer, you can make narrow bias ties
from fabric scraps or double-fold bias tape.

14. Serge-finish or bind the lower raw edge of the band
to finish it. Then turn it to the inside of the dress so
that it measures an even 4” all around. Press and
secure with pins. Stitch in the ditch of the band seam
to secure the band inside.

15. Optional: Add rickrack or other trim along the band
seam-line, turning under the end for a neat finish at
the side seam.
16. You made it—a sweet little dress for a sweet little
girl. And one more thing-- try the dress on the
child, adjust the fullness along both casings for a
comfortable fit, and tie the ribbons into bows. Before
you remove the dress, pin the ribbons to the dress at
the casing opening edges. Stitch through all layers at
each end of each casing so you won’t lose the ribbon
in the wash.
****
YOU Can ORDER Your Pillow Case Dress from Me by emailing me
mscheriluv@hotmail.com for more information on prices