Pillowcase dresses are in demand everyone is buying them, making them or selling them.
I did buy some pillowcase patterns from McCall's and Simplicity and you can go buy them too, they did come with some applique patterns as well that are cute
Then someone sent me this pattern so I am sharing
The pattern was free
I have made several of these pretty summer dresses
I also can make you one, after all who wants to wear ready made everyday when you can wear one of a kind designs.
All my designs are unique handmade with love
YOU Can ORDER Your Pillow Case Dress from Me by emailing me
mscheriluv@hotmail.com for more information on prices
these are 2 of my very beautiful grand baby girls
THEY ARE ADORABLE
Yes I am a very proud grandma
Here is another set of dresses in an Aztec and yellow design
You will need some pretty fabric 44/45”-wide pick something your little girl likes
1 yard print or solid for body of dress
3/8 yard contrasting print or solid for the bottom band
1 package single-fold bias tape, in a color that matches
or contrasts with the dress or bottom band fabric
3 yards 3/4”-wide ribbon for ties
Optional: 1 1/2 yards rickrack or other fun trim
Instructions:
1. Launder the fabrics to remove finishes and allow for
shrinkage. Press to remove wrinkles. Fold each piece
in half with selvages aligned and smooth out any
wrinkles.
2. Cutting across the
contrasting fabric, cut
and 8 3/4”-wide strip for
the bottom band. With
right sides facing, pin and
stitch the contrast strip to
one edge of the pillowcase
panel. Use a 1/4”-wide seam
allowance. Serge- or zigzag
finish the seam allowance
and press it toward the
contrast band.
3. With right sides facing,
stitch 1/2” from the selvage
edges to make a fabric
tube. Press the seam open,
using the selvages as the
seam allowance—or trim
to 1/4” and serge or zigzag
both seam allowance
together and press the seam
allowances to one side.
Figure 1.
4. Turn the fabric tube right side out and press gently
along the seam-line. Place on your cutting table.
5. Measure the child who will wear the dress from
the middle of the front edge of her shoulder to the
desired finished length.
6. Fold the banded fabric panel in half lengthwise.
Beginning 4” below the band seam, measure up the
length determined in step 3 and cut away the excess
fabric. Figure 2. The excess band will be turned to the
inside and stitched later and the upper edge will be
finished with a casing
7. Fold the tube in half lengthwise with the upper raw
edges aligned. Cut an armhole as shown. Also cut a
gentle curve at the upper edge for the neckline.
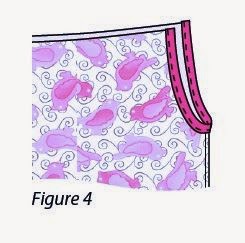
8. Bind the armhole edges with contrasting bias tape.
edge of the dress and add 1”. Cut (2) 1 3/4”-wide true bias
strips that length from fabric leftovers or other
fabric scraps in your stash.
10. Turn under and press 1/2” on one long edge of each
piece of bias. With right sides facing and long raw
edges even, stitch a bias strip to each neckline,
allowing half of the excess length to extend at each
end. Use a 1/4”-wide seam allowance and press the
seam allowance toward the bias.
11. Under-stitch through all layers close to the seam-line
to make it easy to turn and press the casing. Turn in
the excess at each end and press. Stitch 1/4” from the
short folded ends and trim excess bias close to the
12. Turn the casing to the inside and press. Stitch the
folded edge in place to finish the casing on the front
13. Cut the ribbon into 2 equal lengths and thread
each one through a casing to tie in bows over each
shoulder. Trim the ribbon ends at an angle to prevent
raveling.
Note: If you prefer, you can make narrow bias ties
from fabric scraps or double-fold bias tape.
14. Serge-finish or bind the lower raw edge of the band
to finish it. Then turn it to the inside of the dress so
that it measures an even 4” all around. Press and
secure with pins. Stitch in the ditch of the band seam
15. Optional: Add rickrack or other trim along the band
seam-line, turning under the end for a neat finish at
the side seam.
16. You made it—a sweet little dress for a sweet little
girl. And one more thing-- try the dress on the
child, adjust the fullness along both casings for a
comfortable fit, and tie the ribbons into bows. Before
you remove the dress, pin the ribbons to the dress at
the casing opening edges. Stitch through all layers at
each end of each casing so you won’t lose the ribbon
in the wash.
****
YOU Can ORDER Your Pillow Case Dress from Me by emailing me
mscheriluv@hotmail.com for more information on prices


