How to make Leather Leaf Jewelry and Mask
Had to share this beautiful ArtworkThis project is Easy and fun for adults and kids and you can do so much with leather to make it into any kind of jewerly
What you'll need
leather scraps,
scissors,
hot Glue Gun
Pre cut chain
2 0 rings
ornament hooks,
leaf shapes use real leaves or ones printed from the internet
Step 1: using your printouts as a guide, cut out leaf shapes (rather than using pins, which will leave holes in leather, use a piece of tape to affix the printout)
step 2 Now when you have your Leaf Design cut out
Now its Time to paint them to your Desired design Realistic or all natural looking with leaves and give it a natural look
Easiest way for this is to look at real leaves and see the color and paint them accordingly
What you will need to paint your Leather Leaf Cut outs
Clean Rags
Soft-bristled Hobby Brushes
Hobby Paintbrushes
Sponges
Pint Of Water
Flat Paintbrushes
Acrylic Paints Fall/ Autumn colors and Green as well
Sandpaper
Here are some tips I have learned on how to prepare leather for successful painting.
Clean the leather surface.
Before applying paint to leather, clean the surface thoroughly. Wipe it with a water-dampened cloth or a small amount of mild soap and water. I also have found that using an old toothbrush works well.
Take the shine off.
Suede leather usually holds paint well, but smooth, shiny leather often has a wax or oil finish that prevents paint from adhering. Be sure that you have taken the shine off portions of the leather that will be painted. This will help the paint to bind.
Remove coatings and surface oils.
Wipe with rubbing alcohol to remove surface oils and any protective coatings from the areas where you will be applying paint. (I also have read that denatured alcohol and acetone are other good options.) Then sand the areas that will be painted, using fine sandpaper or emery cloth. Besides helping to remove the coating, sanding also will "rough up" and "raise a tooth" in the painting surface just enough to make a big difference in how well the paint adheres.
Instructions
1.Clean the leather thoroughly before applying paint to the surface. Add 1 oz. leather bleach to a pint of water to make a gentle leather cleanser. Apply the cleanser with a soft-bristled brush or wool dauber.
2.Use acrylics to paint on leather. Make sure that the label of the acrylic paint container states that the paint is safe for use with leather.
3.paint over a large area or use it to embellish only small portions of the leather project.
4.Cover a large surface area with paint by first applying a solution of paint and water to the leather's surface. This will prepare the leather's surface for the application of undiluted paint.
5.Mix a solution of one part water to one part paint and use a wool dauber to apply the solution to the leather's surface. Apply with long, even strokes.
6.Add more water to the solution if you see that it is not being absorbed into the leather's surface. Add more paint if you see that the solution is not adding much color to the surface.
7.Apply one or two coats of the solution, allowing the paint to be completely absorbed into the leather between coats. The leather should remain slightly damp, not dry.
8.Apply the undiluted acrylic paint with a large paintbrush or wool dauber. Make sure that the coats of paint are applied evenly. Use long, even strokes.
9.Embellish small areas on the leather's surface by applying undiluted acrylic paint with a small paintbrush.
10.Flex the leather several times during the drying process. This will help prevent the paint from cracking when the piece is completely dry. Flex the leather in between coats of paint as well.
Now once it Dries and the leaf is painted to your satifaction
now what you do with the leaf is up to you
you could turn it into a necklace or Earrrings the choices are yours
or make a nice leaf brachlet or pendant
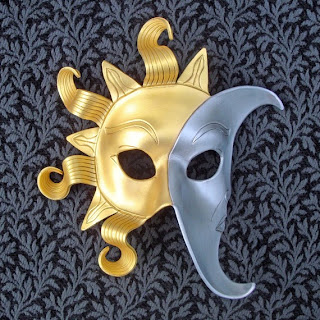
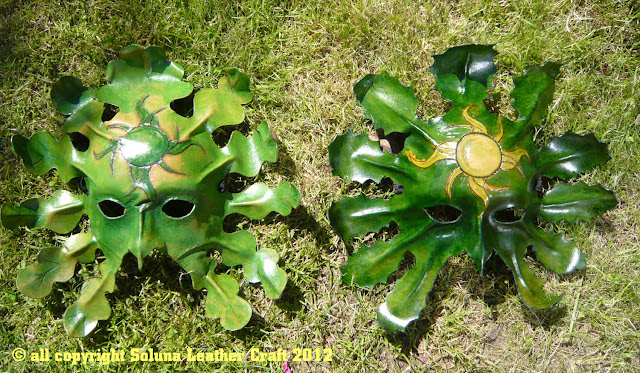
or even a Leaf Mask Perfect for Mabon or Samhain or Yule or Beltane any holiday where you need to invoke the magical side of nature
to Make a Leather Mask
Things You'll Need
Card stock
Pencil
Scissors
X-acto knife
Scotch tape
Vegetable tanned leather
Face form
Leather hole puncher
Leather dyes or acrylic paints and brushes
Here is a Quick Tutorial how to make a Leather mask But Remember you can make anything your imagination allows animals Goddess Gods Aliens nature anything you can turn into a mask
1
Sketch out ideas until you have a design. Masks can be full face or half face, with odd shapes and ridges, feelers and extensions. Keep your first project simple.
2
Fold your cardstock in half. Stand in front of a mirror and hold the cardstock with the fold lining up with the center of your nose. Trace out the eye hole placement. Mark the bottom of your nose. If making a full face, mark out the mouth area.
3
Pencil in your design on one side of the card stock. Check the design in the mirror and correct for size and shape. Make any adjustments. Use an X-acto knife to cut out the eye and mouth, if needed. Check the mirror once more for fit. With the cardstock still folded, cut the template out.
4
Position your opened template on the leather to take advantage of natural grain and color. Tape the template in place with scotch tape then trace the design onto the leather. Transfer the leather to a hard surface, such as a mat board, and cut out with the X-acto knife.
5
Wet the leather thoroughly. Leather conforms to shaping as it dries. Once soaked, wring out excess water and pat dry. Let the mask rest for approximately 30 minutes. Keep an eye on it so it doesn't dry out too quickly.
6
Apply the damp mask to a face form, or you can slap it on your own face. Press in at the sides of the nose and outside eyes to conform to your cheekbones. Hold in place to begin shaping. You can use a hair dryer in spurts to speed up the process.
7
Pinch in interesting creases and folds as the leather begins to dry and hold its shape. Take care not to overheat the leather. Leave it to dry on its own once you've reached the desired shape. Before it dries completely, punch in tie holes on each side.
8
Paint your mask with leather dyes or acrylic paints. Use glaze or varnish to seal the colors in place. Add any other ornamentation. Fasten tie laces
Here are some examples I did not make these they belong to the person/s who created them These are Examples meant to inspire you to make ones simlar to them
anything you can think of you can make from necklaces to pendants to earrings to anklets to bracelets to anything you can imagine
Remember to be crafty and have fun.


wow great job .. i like it.. :) http://www.psdaimaandsons.com
ReplyDeleteI love this discussion of the structural logic of posting.
ReplyDeleteThanks, Leather Jewelry