Saturday, October 19, 2013

Banana for Breakfast anyone??


This is interesting. After reading this, you'll never look at a banana in the same way again.

Bananas contain three natural sugars - sucrose, fructose and glucose combined with fiber. A banana gives an instant, sustained and substantial boost of energy.

Research has proven that just two bananas provide enough energy for a strenuous 90-minute workout. No wonder the banana is the number one fruit with the world's leading athletes.

But energy isn't the only way a banana can help us keep fit. It can also help overcome or prevent a substantial number of illnesses and conditions, making it a must to add to our daily diet.

DEPRESSION:
According to a recent survey undertaken by MIND amongst people suffering from depression, many felt much better after eating a banana. This is because bananas contain tryptophan, a type of protein that the body converts into serotonin, known to make you relax, improve your mood and generally make you feel happier.

PMS:
Forget the pills - eat a banana. The vitamin B6 it contains regulates blood glucose levels, which can affect your mood.

ANEMIA:
High in iron, bananas can stimulate the production of hemoglobin in the blood and so helps in cases of anemia.

BLOOD PRESSURE:
This unique tropical fruit is extremely high in potassium yet low in salt, making it perfect to beat blood pressure So much so, the US Food and Drug Administration has just allowed the banana industry to make official claims for the fruit's ability to reduce the risk of blood pressure and stroke.

BRAIN POWER:
200 students at a Twickenham school ( England ) were helped through their exams this year by eating bananas at breakfast, break, and lunch in a bid to boost their brain power. Research has shown that the potassium-packed fruit can assist learning by making pupils more alert.

CONSTIPATION:
High in fiber, including bananas in the diet can help restore normal bowel action, helping to overcome the problem without resorting to laxatives.

HANGOVERS:
One of the quickest ways of curing a hangover is to make a banana milkshake, sweetened with honey. The banana calms the stomach and, with the help of the honey, builds up depleted blood sugar levels, while the milk soothes and re-hydrates your system.

HEARTBURN:
Bananas have a natural antacid effect in the body, so if you suffer from heartburn, try eating a banana for soothing relief.

MORNING SICKNESS:
Snacking on bananas between meals helps to keep blood sugar levels up and avoid morning sickness.

MOSQUITO BITES:
Before reaching for the insect bite cream, try rubbing the affected area with the inside of a banana skin. Many people find it amazingly successful at reducing swelling and irritation.

NERVES:
Bananas are high in B vitamins that help calm the nervous system..

Overweight and at work? Studies at the Institute of Psychology in Austria found pressure at work leads to gorging on comfort food like chocolate and chips. Looking at 5,000 hospital patients, researchers found the most obese were more likely to be in high-pressure jobs. The report concluded that, to avoid panic-induced food cravings, we need to control our blood sugar levels by snacking on high carbohydrate foods every two hours to keep levels steady.

ULCERS:
The banana is used as the dietary food against intestinal disorders because of its soft texture and smoothness. It is the only raw fruit that can be eaten without distress in over-chroniclercases. It also neutralizes over-acidity and reduces irritation by coating the lining of the stomach.

TEMPERATURE CONTROL:
Many other cultures see bananas as a 'cooling' fruit that can lower both the physical and emotional temperature of expectant mothers. In Thailand , for example, pregnant women eat bananas to ensure their baby is born with a cool temperature.

So, a banana really is a natural remedy for many illnesses. When you compare it to an apple, it has FOUR TIMES the protein, TWICE the carbohydrate, THREE TIMES the phosphorus, five times the vitamin A and iron, and twice the other vitamins and minerals.. It is also rich in potassium and is one of the best value foods around So maybe its time to change that well-known phrase so that we say, 'A BANANA a day keeps the doctor away!'

Thursday, October 17, 2013

Decorate Your Pumpkins without Carving-child friendly too


Here are some really creative Ideas to Decorate with Pumpkins this year without Carving.
NOTE: To the nice lady who called about the stencils/designs for these, I'm sorry I did not call back yet, however I've had bronchitis and can hardly talk loudly enough to be heard and now a stomach bug that has lasted over 5 days, this is not good, I will tell you that the site that posted these last year as noted here, does not seem to still have the patterns available, and I did not save them, what I suggest is you find a font you like and print out your design then trace it onto your pumpkins.
Hope this helps.


With Halloween right around the corner, DIYers everywhere are turning their creative efforts to a new task- pumpkin carving. Although we still carve them, we also paint, glitter, stuff and even bake with them.  So whether you’re looking for an easier craft trying to involve your children while keeping safety a top-priority, these no-carve DIYs are perfect for you. I have compiled a variation of pumpkins for your viewing pleasure from all around

Child-Friendly Designs

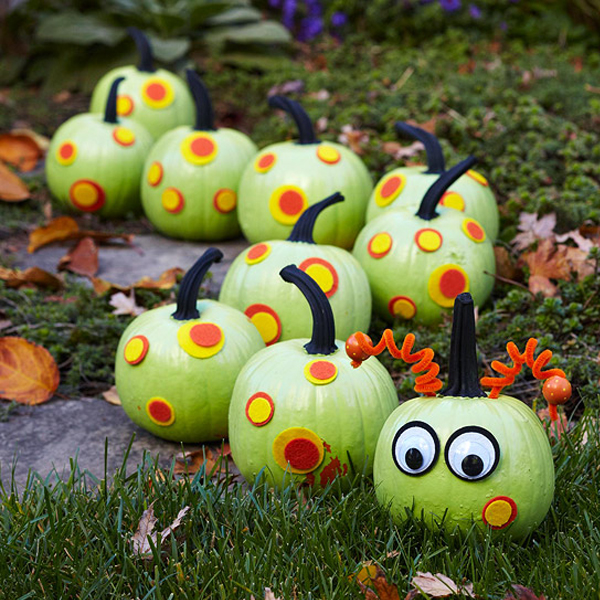
Pumpkin designs don’t have to be spooky! Display this adorable centipede DIY from Better Homes and Gardens in your front yard. Spray paint each “body segment” with lime green paint, and finish off with felt spots and two giant googly eyes. For an extra creepy (cute!) touch, have your centipede poke out from a section of tall grass.

These make a cute giant caterpillar don't they?


SPOOKY boo!! with glitter silver paints is so cute
then we have the skeleton pumpkin gate watcher here
which gives me ideas because I have an old plastic skeleton missing a head that would be great here


Here is a cute idea, just need some ribbon and rick rack and glue, and let the kids even join in making these
Oh but you must see this cute Pumpkin Owl, with the Owl Lovers out these days, she is sure to make a hit.

if you're the type who has old stuff laying around the garage or barn, here's something you're sure to go for, its really appealing.
I for one love crows, they are one of my totem animals
so I'm thinking of making one with an artificial pumpkin that can be reused, which you could do with most of these.
what is halloween without a few bats around

these are not only perfect for my home but easy too, takes some simple duct tape and lots of time.

another favorite of mine, you can download the pattern here and paint the design

this could be used to represent your family, how happy
OH yes I do like Glitter--this is a keeper
BUTTONS and a BOW
how cute is this


and Of course the Witchy stockings and shoes
adorable, painted on and add a bow
the breast cancer awareness Pumpkins, think Pink, give because you care
save the tata's


Wednesday, October 16, 2013

Baby Girls Shower Cake


My baby girl recently had her baby shower for baby #2
Her sister and I made her cake for the party
The cake we bake is so moist and it's frosted lightly with icing then we cover it in delicious marshmallow fondant which my daughter makes herself. I shape the fondant and together we make these beautiful artwork cakes.
Working with fondant is time consuming but todays newer recipes and flavors make them much more appealing than they used to be.
I am so proud of my girls taking after my crafting and cooking talents.

Crafting for my Grand Baby Abby


So my baby girl is going to have her 2nd baby very soon, in just a few weeks now
So we gave her a baby shower and guess what her baby theme is?  OWLS that's right and I can't believe how popular Owls have become. Cute little dickens they are too.

So I decided to make her an Owl Taggie Blanket
Then after that was finishes I decided to make this cute Wall Decor or Door Hanger for Baby Abby
it's all made from felt with some machine stitches and hand Needlework too
It's so cute

Once the tree limb was complete with the lil owl and bird and some flowers then I added leaves, ladybug and a name plate

It's just adorable and I can make other designs and any name, so these give me a great idea for baby gifts and craft show items.
Yes I have been busy. Between this and cooking and writing up new recipes, who has time!!

Scarecrow Taco Dip

Isn't this a cute idea for the Great Halloween/Samhain Festivities? Yeah I thought so too
Found it on http://www.holidaycottagepage.com/ so I am sharing it
This will be great for our Halloween Party this year. I can't wait, we work so hard on decorations and foods and costumes, it's one fantastic fun family and friends get together.
Ingredients
1 package (8 oz) cream cheese, softened
2 teaspoons Old El Paso® taco seasoning mix (from 1-oz package)
½  cup Old El Paso® Thick 'n Chunky salsa
¼ cup sliced ripe olives
1 cup shredded Cheddar cheese (4 oz)
1 cup Old El Paso® refried beans (from 16-oz can)
1 cup chopped lettuce
2 cherry tomatoes
Triangular-shaped tortilla chips (about 3 inch)
Instructions
  1. 1 In small bowl, mix cream cheese and taco seasoning mix until smooth. Spread on 10-inch plate. Spoon salsa evenly over cream cheese mixture. Reserve 4 olive slices; sprinkle remaining olives over salsa. Reserve 1/4 cup cheese; sprinkle remaining cheese over olives. Spoon beans in center of plate; spread to 6-inch circle to resemble head of scarecrow. Sprinkle lettuce around beans.
  2. 2 Cut 1 tomato in half; place each half on scarecrow, cut side up, to resemble eyes. Add remaining tomato to resemble nose. Place 1 reserved olive slice on each “eye” to resemble pupil. Cut the remaining olive slices in half and arrange the pieces to resemble mouth.
  3. 3 Arrange tortilla chips to resemble a hat on the scarecrow’s head. Arrange the reserved cheese to come out from under the hat and at the bottom of the face to resemble straw. Serve dip with tortilla chips. Store dip in refrigerator.

By Pillsbury.com

Chomping Monsters

I found these cute cookies over at Pillsbury 


Chomping Monsters
These are definitely on my to do list for our Halloween.

Ingredients
1 package (16 oz) Pillsbury® Ready To Bake!™ refrigerated chocolate chip cookies (24 cookies)
1 ¼ cups white vanilla baking chips
1 container ready-to-spread frosting (any white variety)
Gel food colors, if desired
Decorations, if desired
Red or black string licorice
Miniature semisweet chocolate chips
Large marshmallows

Candy-coated chocolate candies
    Instructions
    1. 1 Heat oven to 350°F. On ungreased cookie sheet, place cookie dough rounds 2 inches apart. Bake 12 to 16 minutes or until edges are light golden brown. Cool 2 minutes; remove from cookie sheet to cooling rack. Cool completely, about 10 minutes.
    2. 2 Meanwhile, in medium microwavable bowl, microwave 1 cup of the white vanilla baking chips uncovered on High 45 seconds. Stir; if necessary, microwave in 15-second increments, stirring after each, until chips can be stirred smooth. Cool 5 minutes. Stir in frosting until well blended. Reserve 2 tablespoons of the frosting mixture to attach decorations. Use gel food colors to tint remaining frosting in desired colors. Spoon each color of frosting into resealable food-storage plastic bag. Cut 1/2 inch off one corner of bag, and pipe on bottom of 1 cookie. Press another cookie, flat side down, on frosting at an angle, cookies touching on one side and about 1 inch apart on the other, to look like open mouth.
    3. 3 To decorate, press remaining white vanilla baking chips in frosting for teeth. Use reserved frosting mixture to attach eyes, using decorations as desired.
    By Pillsbury


    and facebook

    Tuesday, October 15, 2013

    Making Your Own Rock Candy

    I am trying to remember how my Mom made Homemade Rock Candy and find her recipe.
    Found her Recipe too and Here is My Mom's Recipe for making Rock Candy. It's so Easy

    ROCK CANDY
    What You NEED:
    2 1/2 c. sugar
    1 c. water
    1-1/2 c. white Karo syrup
    1 tsp. oil flavoring
    1 tsp. food coloring (your choice of colors)

    What you Need to DO:
    Combine first 3 ingredients together in a saucepan. Bring to a boil.
    Cook to 300 degrees for hard crack. Remove from heat and add coloring
    and oil flavoring. Pour in cookie sheet sprinkled with powdered sugar.
    After it is hard, sprinkle more sugar on candy. Then break in pieces.
    (Oil flavorings are spearmint, cinnamon, anise, wintergreen,
    ***
    Then I wanted more ideas
    So I went on a research Spree and found a few recipes, (there are Dozens)
    Here is what I found that helped me out.....Rock candy is a simple sugar candy that can double as a science experiment. The process can take up to a week, but it’s fun to watch the sugar crystals growing over time. Note that the exact quantity of sugar syrup you will use depends on the size of the jar you have. If you want to make several pieces of rock candy, use multiple jars and skewers, and double or triple the sugar syrup solution as necessary.
    Ingredients:
    2 cups water
    4 cups granulated sugar
    1/2-1 tsp flavoring extract or oil (optional)
    food coloring (optional)
    glass jar
    skewer or thread (see below)
    Preparation:


    1. Prepare your materials: wash a glass jar thoroughly with hot water to clean it. Cut a length of thick cotton thread a few inches longer than the height of the jar, and tape it to a pencil. Place the pencil across the lip of the jar, and wind it until the thread is hanging about 1 inch from the bottom of the jar. Attach a paper clip to the bottom of the thread to weight it and ensure it hangs straight down. Alternately, you can use a wooden skewer as the base of your rock candy, and use clothespins balanced across the top of the jar to clip it into place.

    2. Wet your thread or wooden skewer, and roll it in granulated sugar. This base layer will give the sugar crystals something to “grab” when they start forming. Set the thread or skewer aside to dry while you prepare your sugar syrup.

    3. Place the water in a medium-sized pan and bring it to a boil. Begin adding the sugar, one cup at a time, stirring after each addition. You will notice that it takes longer for the sugar to dissolve after each addition. Continue to stir and boil the syrup until all of the sugar has been added and it is all dissolved. Remove the pan from the heat.

    4. If you are using colors or flavorings, add them at this point. If you are using an extract, add 1 tsp of extract, but if you are using flavoring oils, only add ½ tsp, and make sure you don’t stand right in front of the pan—the scent can be very strong as it rises in the steam. Add 2-3 drops of food coloring and stir to ensure even, smooth color.

    5. Allow the sugar syrup to cool for approximately 10 minutes, then pour it into the prepared jar. Lower the sugared string or skewer until it hangs about 1 inch from the bottom.

    6. Carefully place your jar in a cool place, away from harsh lights, where it can sit undisturbed. Cover the top loosely with plastic wrap or paper towel.

    7. You should start to see sugar crystals forming within 2-4 hours. If you have seen no change to your skewer or thread after 24 hours, try boiling the sugar syrup again and dissolve another cup of sugar into it, then pour it back into the jar and insert the string or skewer again.

    8. Allow the rock candy to grow until it is the size you want. Don’t let it grow too large, otherwise it might start growing into the sides of your jar! Once it has reached the size you want, remove it and allow it to dry for a few minutes, then enjoy or wrap in plastic wrap to save it for later.

    ****and oh look I found pictures too :) how helpful is this

    Making Rock Candy another Recipe too
    Ingredients

    1 cup of water
    3 cups of sugar
    Food coloring (optional)
    Flavoring (optional)


    EditSteps

    1Start a pot of water boiling on the stove.


    2Twist a piece of cotton string (or a pipe cleaner) around the middle of the stick. The cotton string should be long enough so that when the stick is placed over the top of the glass, the string will hang just short of the bottom.


    3Wet the string with a little water and roll it in the sugar.


    4Lay the stick over the top of the glass jar so that the string hangs down inside the jar, but doesn't touch the bottom of the jar.


    5When the water has started boiling, remove it from the heat and let the water settle.


    6Stir in the sugar one half cup at a time. Continue adding the sugar until it starts collecting at the bottom of the pot and will not dissolve even when you stir. This will take a while and a good bit of sugar but not too much.


    7If you want to add flavoring or color, stir it in now.


    8Pour the sugary syrup solution into the glass until it is about 1 inch (2.5cm) from the top.


    9Place the pencil over the jar and allow the string to dangle into the solution. Don't let the string settle on the bottom or sides of the glass.


    10Place the glass somewhere where it can sit for a while undisturbed (but do not refrigerate it). After a day or so, you should start to see crystal growth forming on the string.


    11Leave the string in the solution until the crystals are big enough for your liking or they have completely stopped growing.


    12Remove the string from the glass and let dry.


    13After it dries, wait until the crystal is formed. You have a choice now to either eat the rock candy or keep it.