Sunday, July 7, 2013

Homemade Bouncy Balls

Homemade Bouncy Balls
Kids always need something to do and play with, the toddlers will have fun with these
and the older kids can help make them


2 cups
Measuring spoons
A stir stick
2 tbsp hot water
1/2 tsp borax
1 tbsp glue
1 tbsp corn starch
Food coloring (optional)

Pour the water and borax into the first cup and stir the mixture until it is dissolved.

Pour the glue, cornstarch and food coloring into the second cup and mix. Then add the mixture from the first cup into the second cup.

Let the ingredients sit for 15 seconds then stir.

Once the mixture becomes difficult to stir, scoop it out of the cup, and roll into a ball. Enjoy!!!

Saturday, July 6, 2013

Candied or Crystallized Flowers

Candied or Crystallized Flowers
 When growing flowers in my garden I always love spending time with them, and I am always looking for ways to extend their beauty, so when I found out you could candy them and use them on cakes, in foods and drinks(ice cubes) and things I was even happier to have my flowers and herbs.

Rinsed and dried edible flower blossoms, separated from the stem (suggestions: apple or plum blossoms, borage flowers, lilac florets, rose petals, scented geraniums, and the violas - violets, Johnny-jump-ups, and pansy petals)
1 extra-large egg white, at room temperature
Few drops of water
About 1 cup superfine sugar
A small paint brush
A baking rack covered with waxed paper

Instructions
Good candidates for candying are apple or plum blossoms, borage flowers, lilac florets, rose petals, scented geraniums, and the violas - violets, Johnny-jump-ups, and pansy petals.

This job takes a little patience; it seems to go more quickly if you do it with a friend. The following recipe will coat quite a few flowers, but if you need more, mix up a second batch.

In a small bowl, combine the egg white with the water and beat lightly with a fork or small whisk until the white just shows a few bubbles. Place the sugar in a shallow dish.

Holding a flower or petal in one hand, dip a paint brush into the egg white with the other and gently paint the flower. Cover the flower or petal completely but not excessively. Holding the flower or petal over the sugar dish, gently sprinkle sugar evenly all over on both sides. Place the flower or petal on the waxed paper to dry. Continue with the rest of the flowers.

Let the flowers dry completely; they should be free of moisture. This could take 12 to 36 hours, depending on atmospheric humidity. To hasten drying, you may place the candied flowers in an oven with a pilot light overnight, or in an oven set at 150 degrees to 200 degrees F with the door ajar for a few hours.

Store the dried, candied flowers in airtight containers until ready to use. They will keep for as long as a year.

Credits
Recipe from: Texas A&M Horticulture

Crystallized Roses by Meadowsweets
Edible candied flowers can be used as toppers for cakes, pies, sorbet, ice cream, truffles, and cupcakes.
Bag them up and give as sweet wedding guest gifts.
Add them atop beverages.
Decor for many dishes such as fruit salad or around a holiday wedding table.
They’re an inexpensive decor item and edible treat.
They don’t create waste – they vanish into bellies and if not eaten of course they completely biodegrade.
They taste fabulous.
Excellent flowers to crystallize for green weddings: Lilacs, violets, rose petals, cowslip, angelica, rosemary, sage, pinks, borage, primroses, and lavender. Leaves such as lemon balm, lemon verbena, mint, and bergmot can also be coated with sugar. Really, any edible plant can be crystallized. Just make sure you research which flowers and leaves are safe to eat before using them to make candied flowers.

Health matters: Flowers used for candied flowers need to be home grown or purchased from a reliable organic flower source. Flowers laced with sugar are cool – flowers laced with pesticides don’t belong at your green wedding.

How to make candied flowers and candied leaves:
Pansies are especially pretty in the springtime and eatable

Pick flowers on a sunny dry day – you don’t want wet petals.
Remove all stalks and white bases from petals, also remove any sharp edges, thorns, and petals that look icky. Once you coat a flower with sugar it’ll make any problems stand out.
Lightly beat an egg white until just foamy.
Dip each flower into the egg white to coat. Make sure to use plastic tweezers if holding by the petals (metal will bruise petals).
Dip into organic caster sugar.
Place on wax paper atop a wire cooling rack.
Place in your extremely low heated oven with the door slightly open. You can also dry flowers in a well enclosed solar oven or a hot greenhouse but note, small flowers are delicate and will blow away.
Once your flowers are nicely dry in the oven (not sticky or dusty to the touch) they’re done.
Candied flower storage and handling:

If you store your candied flowers in a moisture-free, air-tight containers, at room temperature (no direct sunlight) they should last a good long while. If you’re making these for a wedding, I’d make them no more than a month in advance.
Place your candied flowers your cake or other food item about 24-48 hours prior to the event; note – you can store these in the fridge or freezer once on a cake but store your cake uncovered. Placing a cover over may create too much moisture for the flowers.
To attach flowers to a wedding cake use a tiny drop of icing and be careful, as your flowers are delicate.

Tuesday, July 2, 2013

The story of Pussy Willows

According to an old Polish legend, many springtimes ago a mother cat was crying at the bank of the river in which her kittens were drowning. The willows at the river's edge longed to help her, so they swept their long graceful branches into the waters to rescue the tiny kittens who had fallen into the river while chasing butterflies. The kittens gripped on tightly to their branches and were safely brought to shore. Each springtime since, goes the legend, the willow branches sprout tiny fur-like buds at their tips where the tiny kittens once clung.


Sunday, June 30, 2013

EAT Your Avocado-The Perfect Food

556607_339420112833333_1298033294_n

Avocado Health Benefits: Is This the World’s Most Perfect Food?

Avocado’s the World’s Most Perfect Food and its Health Benefits

Did You Know that the avocado has been called the world’s most perfect food and has many health benefits? It has achieved this distinction because many nutritionists claim it not only contains everything a person needs to survive — but it has also been found to contribute to the prevention and control of Alzheimer’s, cancer, heart disease, diabetes and other health conditions.
The avocado (Persea gratissima or P. americana) originated in Puebla, Mexico and its earliest use dates back to 10,000 years B.C. Since AD 900, the avocado tree has been cultivated and grown in Central and South America. In the 19th century, the avocado made its entry into California, and has since become a very successful commercial crop. Ninety-five percent (95%) of U.S. avocados are gown in Southern California.
The avocado, also called the alligator pear, is a high-fiber, sodium- and cholesterol-free food that provides nearly 20 essential nutrients, including fiber, is rich in healthy monounsaturated and polyunsaturated fats (such as omega-3 fatty acids), vitamins A, C, D, E, K and the B vitamins (thiamine, riboflavin, niacin, pantothenic acid, biotin, vitamin B-6, vitamin B-12 and folate) — as well as potassium.
Foods naturally rich in omega-3 fatty acids, such as avocados, are widely acknowledged as the secret to a healthy heart, a brilliant brain and eagle eyes.
Dr. Daniel G. Amen, a clinical neuroscientist, psychiatrist, brain-imaging expert and author of the New York Times bestseller Change Your Brain, Change Your Life counts avocados as one of the top brain-healthy foods that can help prevent Alzheimer’s Disease.
That’s not only because of the avocado’s health benefits omega-3 fatty acid content but also its…
avocado health benefits
Vitamin E content — An international journal called Alzheimer’s Disease and Associated Disorders, reported its findings from years of clinical trials — high doses of Vitamin E can neutralize free radicals and the buildup of proteins to reverse the memory loss in Alzheimer’s patients; reverse symptoms of Alzheimer’s in the early stages and retard the progression of the disease;
Folate content — helps to prevent the formation of tangled nerve fibers associated with Alzheimer’s.
The virtues and benefits of the avocado are too numerous to mention.

But Here Are Just a Few More Avocado Health Benefits That Its Nutritional Profile Provides:

  • Monounsaturated Fats — These types of fats help control triglycerides in the bloodstream, lower blood cholesterol and control diabetes.
  • Folate — This water-soluble B vitamin promotes healthy cell and tissue development. According to the National Institute of Health’s Office of Dietary Supplements, “This is especially important during periods of rapid cell division and growth such as infancy and pregnancy. Folate is also essential for metabolism of homocysteine and helps maintain normal levels of this amino acid.”
  • Lutein — This is a carotenoid (a natural pigment) that protects against cataracts and certain types of cancer, and reduces the risk of macular degeneration, the leading cause of blindness in adults 65 years of age and older. Avocados contain 3 or more times as much lutein as found in other common vegetables and fruits.
  • Oleic acid and Potassium — Both of these nutrients also help in lowering cholesterol and reducing the risk of high blood pressure.
You can add these avocado benefits to your diet in many ways:
    1) The easiest way is to cut the avocado in half and sprinkle it with herbal seasoning or maple syrup.
    2) Chop the avocado and add it to a salad, or use it as a topping or side garnish for soup.
    3) Mash an avocado and spread it on bread or a bagel (in place of butter or cream cheese).
    4) Cut an avocado in half and fill the little hollow (left after you remove the pit) with your favorite healthy topping such as herbed rice or couscous.
    5) Make an avocado dressing or the crowd-pleasing guacamole dip to add flavor to raw or steamed vegetables. You can easily find many avocado recipes online.
Blended with fruit, avocados make a rich and delicious snack, side dish or dessert — and produces highly-nutritious baby food which delivers “good fat” for baby’s brain and physical development.
Before you indulge in avocados to your heart’s content, however, remember that they have lots of calories because of their fat content. According to WebMD, “A medium-sized avocado contains 30 grams of fat, as much as a quarter-pound burger”.
That’s why diet experts have long urged Americans to go easy on avocados in favor of less fatty fruits and vegetables. But now nutritionists are taking another look.
They’re finding that most of the fat in an avocado is monounsaturated — the “good” kind that actually lowers cholesterol levels. Thanks to this new understanding, the U.S. government recently revised its official nutrition guidelines to urge Americans to eat more avocados.

Saturday, June 29, 2013

DIY:Make a Pillowcase Dress

Pillowcase dresses are in demand everyone is buying them, making them or selling them. 
So here are some easy instructions to make them for your little girls.

I did buy some pillowcase patterns from McCall's and Simplicity and you can go buy them too, they did come with some applique patterns as well that are cute
Then someone sent me this pattern so I am sharing
The pattern was free 
I have made several of these pretty summer dresses
I also can make you one, after all who wants to wear ready made everyday when you can wear one of a kind designs.
All my designs are unique handmade with love
YOU Can ORDER Your Pillow Case Dress from Me by emailing me
mscheriluv@hotmail.com for more information on prices

these are 2 of my very beautiful grand baby girls
THEY ARE ADORABLE
Yes I am a very proud grandma
Here is another set of dresses in an Aztec and yellow design


You will need some pretty fabric 44/45”-wide pick something your little girl likes
1 yard print or solid for body of dress
3/8 yard contrasting print or solid for the bottom band
1 package single-fold bias tape, in a color that matches
or contrasts with the dress or bottom band fabric
3 yards 3/4”-wide ribbon for ties
Optional: 1 1/2 yards rickrack or other fun trim

Instructions:
1. Launder the fabrics to remove finishes and allow for
shrinkage. Press to remove wrinkles. Fold each piece
in half with selvages aligned and smooth out any
wrinkles.
2. Cutting across the
contrasting fabric, cut
and 8 3/4”-wide strip for
the bottom band. With
right sides facing, pin and
stitch the contrast strip to
one edge of the pillowcase
panel. Use a 1/4”-wide seam
allowance. Serge- or zigzag
finish the seam allowance
and press it toward the
contrast band.
3. With right sides facing,
stitch 1/2” from the selvage
edges to make a fabric
tube. Press the seam open,
using the selvages as the
seam allowance—or trim
to 1/4” and serge or zigzag
both seam allowance
together and press the seam
allowances to one side.
Figure 1.
4. Turn the fabric tube right side out and press gently
along the seam-line. Place on your cutting table.
5. Measure the child who will wear the dress from
the middle of the front edge of her shoulder to the
desired finished length.
6. Fold the banded fabric panel in half lengthwise.
Beginning 4” below the band seam, measure up the
length determined in step 3 and cut away the excess
fabric. Figure 2. The excess band will be turned to the
inside and stitched later and the upper edge will be
finished with a casing
7. Fold the tube in half lengthwise with the upper raw
edges aligned. Cut an armhole as shown. Also cut a
gentle curve at the upper edge for the neckline.

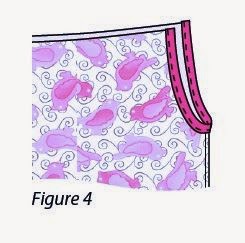
8. Bind the armhole edges with contrasting bias tape.

9. For the upper-edge casing, measure one upper cut
edge of the dress and add 1”. Cut (2) 1 3/4”-wide true bias
strips that length from fabric leftovers or other
fabric scraps in your stash.
10. Turn under and press 1/2” on one long edge of each
piece of bias. With right sides facing and long raw
edges even, stitch a bias strip to each neckline,
allowing half of the excess length to extend at each
end. Use a 1/4”-wide seam allowance and press the
seam allowance toward the bias.

11. Under-stitch through all layers close to the seam-line
to make it easy to turn and press the casing. Turn in
the excess at each end and press. Stitch 1/4” from the
short folded ends and trim excess bias close to the
stitching.

12. Turn the casing to the inside and press. Stitch the
folded edge in place to finish the casing on the front
and back of the dress.

13. Cut the ribbon into 2 equal lengths and thread
each one through a casing to tie in bows over each
shoulder. Trim the ribbon ends at an angle to prevent
raveling.
Note: If you prefer, you can make narrow bias ties
from fabric scraps or double-fold bias tape.

14. Serge-finish or bind the lower raw edge of the band
to finish it. Then turn it to the inside of the dress so
that it measures an even 4” all around. Press and
secure with pins. Stitch in the ditch of the band seam
to secure the band inside.

15. Optional: Add rickrack or other trim along the band
seam-line, turning under the end for a neat finish at
the side seam.
16. You made it—a sweet little dress for a sweet little
girl. And one more thing-- try the dress on the
child, adjust the fullness along both casings for a
comfortable fit, and tie the ribbons into bows. Before
you remove the dress, pin the ribbons to the dress at
the casing opening edges. Stitch through all layers at
each end of each casing so you won’t lose the ribbon
in the wash.
****
YOU Can ORDER Your Pillow Case Dress from Me by emailing me
mscheriluv@hotmail.com for more information on prices

Making a 5 pointed star

These instructions have been found online in a few places and they come in really handy so I am GOING to Share them here. I did not write them NO, never claim to but I have made them YES

How to Cut a 5-Pointed Star in One Snip
George Washington's original pencil sketch for the flag indicated 6-pointed stars, a form he apparently preferred.

Betsy Ross, however, recommended a 5-pointed star. When the committee protested that it was too difficult to make, she took a piece of paper, folded it deftly, and with a single snip of her scissors, produced a symmetrical five-pointed star. This seeming feat of magic so impressed her audience that they readily agreed to her suggestion.

To you we pass along the secret...

Take a thin piece of paper 8-1/2" x 10" (or an exact proportion thereof), fold it as indicated and cut yourself a perfect 5-pointed star.


Thanks to the Betsy Ross House for providing these instructions.

Step 1. Fold an 8-1/2" x 10" piece of paper in half.

Step 2. Fold and unfold in half both ways to form creased center lines. (Note: be sure paper is still folded in half.)

Step 3. Bring corner (1) right to meet the center line. Be sure to fold from the vertical crease line.

Step 4. Bring corner (1) left till edges coincide, then make the fold.

Step 5. Bring corner (2) left and fold.

Step 6. Bring corner (2) right until edges coincide. Then fold.

Step 7. Cut on the angle as shown in the picture. Then unfold the small piece.
Step 8. Marvel at your perfect (we hope!) 5-pointed star

Wednesday, June 26, 2013

9 Foods You Should Be Eating for Type 2 Diabetes

9 Foods You Should Be Eating for Type 2 Diabetes

Healthy eating for type 2 diabetes is about losing weight and preventing dangerous spikes in blood sugar. Nutrition and health expert Joy Bauer explains how these nine foods can help.