Sunday, September 16, 2012

Painted Glass Jars


I washed and dried all of the vases and jars. (TIP: Washing alone didn’t completely remove the residue that the labels left behind. Some cooking oil and a sponge scrubber does a good job removing this residue.)


All I needed to get started on my project was some enamel paint made especially for glass. I already had two small jars of turquoise paint on hand, but I suggest heading over to Creative-Coldsnow in Westport if you are in need of some good quality and affordable enamel paint of your own. A little goes a long way---you won’t need more than two small jars of the paint.


The painting process was surprisingly quick and easy. All you have to do is pour some of the enamel paint into the jar and slowly twirl it around until the entire insides are fully coated. Once coated, dump the remaing paint into the next jar until you have painted the insides of every jar. Then all that you have left to do is let the paint dry, which takes about two days.


(TIP: I didn’t wear gloves, and after the first few minutes into the process, I immediately regretted it as my hands were completely stained. I used the cooking oil to remove the paint, but gloves would have been easier!)


Make your own glitter ornaments

Make your own glitter ornaments

Yes, I realize Christmas is over.
But, this post is to encourage you to go out and purchase clear ornaments that are now on clearance at most craft stores.
I was able to get them for .40 cents on December 23rd.
So, they are probably a great price now.
You will want to make these next year. They are so easy and make a perfect personalized gift. Of course, I found the idea on Pinterest!
Glitter Ornaments (11 of 15)
What you need:
Glitter
Clear Ornaments (glass or plastic)
Pledge Floor Care Finish
Step one:
Take off the silver top. Pour some of the cleaner in the ornament.
Glitter Ornaments (1 of 15)Glitter Ornaments (2 of 15)
Then swirl the cleaner around the inside of the ornament. Try to avoid bubbles. See all my pretty glitter colors? I got all 12 of those at Michael’s for half off. I only spent $6.50.
Glitter Ornaments (3 of 15)
Then pour the excess cleaner back into the jar. I was able to set my smaller ornaments in the hole to drain it.
Glitter Ornaments (4 of 15)Glitter Ornaments (5 of 15)
Next, pour a good amount of glitter inside the ornament. I used a Dixie cup to set my ornament in to make it sturdy.
Glitter Ornaments (6 of 15)
Then swirl the glitter around the ornament so that it is completely covered with glitter. You may have to add more.
Glitter Ornaments (9 of 15)
Next, pour the excess glitter back into the glitter jar. You may have to use a funnel, it just happened to be the perfect size for me so I didn’t use one.
Glitter Ornaments (10 of 15)
Once you get the excess glitter out, wipe it down a bit and put the silver top back on. Here are all the colors I did in a about an hour and a half.
Glitter Ornaments (12 of 15)
Then I got to work personalizing them with my vinyl (our favorite place to get vinyl is from Expressions Vinyl) My dad is a big WSU fan, I made that one for him. I also made a UW one for my step-dad. I forgot to take a picture of it since I did it the next day. It’s funny because I grew up watching the Cougars with my dad, so I sort of feel the need to root for them. But, since I got my degree from UW it also seems wrong. When I told my dad I was planning to go to UW, he actually said to me, ‘Good luck paying for it’. True story. ;) You can see why I would at least still root for them.
P.S. My dad was just joking about paying for it.
Although, I think it still pained him.
Glitter Ornaments (15 of 15)
I also have to explain the Seahawks one. I love my best friend. And she loves the Seahawks. She is actually pretty crafty when she wants to be, but to her credit she just doesn’t have time these days. She just went back to school and works the days she is not at school. Here is the gift that she gave to me, Caryn and Courtney this year.
Can you see what that says?
‘Big plans, ran out of time-make something cool!’
That was our gift. To all three of us. A plain jar with a taped note telling us us to make something ourselves! I love her.
Glitter Ornaments (13 of 15)
So, I decided to put the glitter in the jar she gave me and make something for her. I think it turned out cute!
Glitter Ornaments (14 of 15)
Now, go out and get those clear ornaments that are all on clearance, so that you can make your own ornaments next year!

How to Jewel Your Shoes

DIY Miu Miu Jeweled Heels

Posted by on
You can always rely on Miu Miu for sensational sparkly shoes. And you can always rely on us to show you how to DIY your own pair. Inspired by a pair of jeweled heeled sandals from seasons past, we repurposed some rhinestones leftover from a previous project to create a new and easy tutorial – just in time for that New Year’s Eve party you RSVP’d to!

You’ll need:

I used pre-set rhinestones, leftover from our Miu Miu sneaker tutorial. With flat nose pliers, I pried the prongs open to release the crystal rhinestones. Skip this step if you’re using loose, flat back rhinestones.
Squeeze some glue into a small dish or container. Pick up one of the larger rhinestones with the tweezers, dip the backside into the glue.
Press the stone into the top of the center of the heel. Add several other large stones around the top, gradually working your way down to the middle of the heel with smaller stones. Go back and add small round stones in bare spots. There is no right or wrong way to creating the pattern – have fun with it!
A tip: the smaller round stones will require the tiniest bit of glue. Dip a toothpick into the glue, dab it onto the backside of the stone and apply to the shoe.
Repeat the same steps on the other shoe . . .
And you’re bejeweled!

Glitter Glitter EVERYTHING

Glitter... Everything!
 

First up are these little tea light holders that were totally boring on their own...
I put together a mixture of Mod Podge and glitter (same as the glitter clutch) but this time I dumped the mixture in the candleholder, swirled it around until it covered every area and then let it dry upside down for a day. Now, they are adorable and I keep one in the bathroom to hold my bobby pins which has made my life so much easier when doing my hair! Obviously the other thing I glittered was my iPhone case. I had a freebie case that I wasn't using from when Apple was giving out free cases (because of the antenna issue). A plain black case instantly turned into something very girly and glam that I use all the time now! (I just used the mixture and dipped a foam brush into it and painted the mixture right onto the case. It needed about 3 coats.)

*A note on the tea light holders, you can still use tea lights in them even with the glitter, just get the battery operated ones. They look just as cute and they even flicker a little! I have ones that I always keep in my candle holders.

I buy a ton of candles and always try to keep the jars once they are done being candles because they are great storage holders (I use a few to hold my makeup brushes). So instead of just cleaning it out and leaving it as is, I glittered it! I used a different glitter than the Martha Stewart for this one and it was a very fine, almost powdery glitter which I didn't like as much. It took many more coats to get it to be that glittery. The Martha Stewart glitter is the perfect consistency and opaque which I think looks better. To clean out almost empty candle jars, boil a pot of water with about an inch or two of water (depending on how big your candle jar is and how much wax is left) and put the candle in the pot. It will melt the remaining wax in the jar and then you can dump the wax straight into the garbage and then wash the container out. Use a fork to scoop out the wick holders.
I filled it with my lipglosses and lip liners. Now my bathroom has a lot more glittery additions! And lastly, a jam jar converted into a gold pencil holder that makes my desk much more fun!

There are so many things you can do with Mod Podge and glitter. Just look around your house, I'm sure you'll find as much stuff as I did!

Friday, September 14, 2012

Stuffed Cinnamon Rolls


Stuffed Cinnamon Rolls


I love it when something so simple tastes so delicious! This recipe came to me the other night and I couldn't wait to go to the store to pick up some canned cinnamon rolls. The center of the rolls have a thick layer of sweetened cream cheese (yum!) and the icing is the one that came with the rolls. This is a quick and easy recipe for breakfast or dessert!


Ingredients are as follows:

1 (8 count ) 12.4 ounce can of cinnamon rolls with icing
8 ounces cream cheese, softened
3/4 C powdered sugar
1 tsp. vanilla

1 Tbsp. butter, melted

Directions:

Preheat oven to 350 degrees; grease an 8 x 8 inch pan.

Roll out cinnamon rolls until thin.

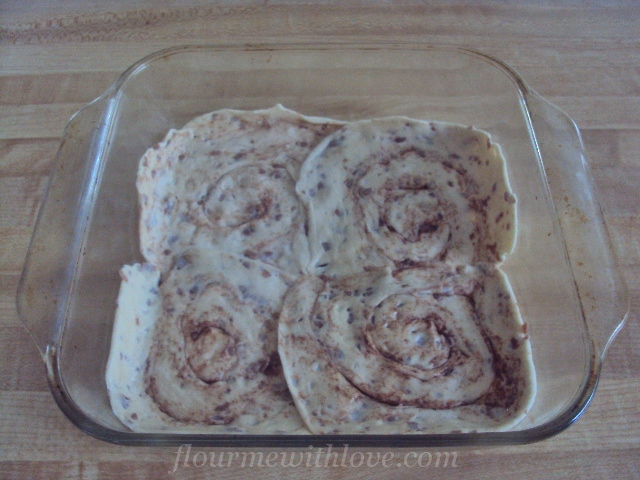
Carefully pick it up (mine fell apart a little) and place four into the pan.


Cream together the cream cheese, powdered sugar and vanilla.


Evenly spread this onto the four cinnamon rolls in the pan.


Place the remaining four cinnamon rolls on top.


Bake for 18-20 minutes; until the edges are golden brown.


Brush the top with the melted butter and drizzle on the icing.


Allow to cool for about 10 minutes. Slice, serve and enjoy!

Friday, September 7, 2012

Wisteria Earrings

Wisteria Earrings
A bit of Springtime, made with seed beads

Wisteria Earrings - Beadwork


We had a huge wall of wisteria along one side of my house when I was a kid and I have always remembered it fondly. Having no room for such a wonder in my current living situation, these will just have to do for now. :-) These earrings look absolutely luscious on and they are very easy to make. It shouldn't take you more than 4 hours to make your first pair and should go even faster with practice.

What You'll Need
  • Size A Nymo beading thread or equivalent (white or light green)
  • Size 13 beading needle
  • 2 earring wires
  • About 310 light green transparent size 11 seed beads (less than 1/10th of a hank)
  • About 366 pink-lined blue (or any other purple bead) sized 11 seed beads (less than 1/10th of a hank)
Note: When I refer to the "back" of a bead, I mean the side opposite where your thread is coming out.


The earring is made up of a stem with 5 sets of branches radiating from it. Each set contains 4 branches. Each set is separated from the next by 5 green stem beads.

Begin by tying a single green seed bead to the end of your thread. Leave a nice long tail to weave back in later. I will refer to this first bead and the other beads that serve the same function as the "center bead." Go through the bead once, and pick up 10 more green beads and three purple beads. Go through the back of the last green bead, then through the front of the next two.


Pick up 3 more purple beads and go through the back of the green bead your thread is coming out of and through the next two green beads.


Repeat the previous step 3 more times, for a total of 5 purple loops counting the one on the end. Basically what you are doing is adding a little purple loop to every other green bead starting from the last and working back toward the center bead. After you add the fifth purple loop, go through the first green bead of the ten you originally added. Now re-enter the center bead from the back. You have now completed your first "branch." Make 3 more branches in the same manner as the first so that you end up with 4 branches radiating out from the center bead. Your thread should be coming out of the center bead.

Pick up 14 green beads and 3 purple ones. The first 5 are part of the stem, the 6th green bead will act as the center bead for the next set of branches, the next 8 make up the first branch of the second set. The second set of branches are made the same way as the first, ie go through the back of the last green bead, through the front of the next two, add a purple loop, etc. The only difference is that each branch in this set is 8 green beads long instead of 10 and has only 4 purple loops. Finish off the set by adding 3 more 8-bead branches.

Now we need to add the 3rd set of branches. The branches of each set are two beads shorter than the branches of the previous set, so pick up 5 stem beads, 1 center bead, and 6 branch beads (12 green) plus 3 purple flower beads. This set of branches has 3 purple flower loops per branch.

The 4th set of branches contain 4 branch beads and 2 purple loops per branch and the 5th set contains 2 branch beads per branch and only one loop. Each set is always separated from the last by 5 stem beads. So, whenever you finish a set, pick up 5 stem beads, 1 center bead and however many branch beads are called for in the next set. Add 3 purple beads and you are set to start the first branch of the next set.

Once you finish the 5th set, finish the earring by picking up 5 more stem beads and three purple beads. Go through the back of the fifth stem bead and up through the entire stem to the top. Pick up 2 green beads, your earring wire, and two more green beads go back down through the entire stem, around the purple loop at the bottom and up again through the stem and the loop containing the earring wire. Repeat this circuit through the stem and earring wire loop as many times as you can while still leaving enough room to weave in the tail you left when you started.

Jalapeno Popper Wonton Bites


I shared a chipotle jalapeno popper wonton cup recipe just a few days ago… This recipe doesn’t have chipotle in it. It’s also panfried, not baked. But I really think that I could have baked these, too. Or of course, you can fry them if you want.

I love using wonton wrappers in my cooking.. I never knew that you could make so many variety of things with wonton wrappers. Soon, I will do a recap of all the recipes using wonton wrappers. Some people have asked where they can find these wonton wrappers. They are usually located in the area where you can get tofu and bean sprouts, or other refrigerated Asian ingredients are.

Some grocery stores only have square ones but occasionally, you can also find round ones… which makes the authentic half moon shaped Korean or Japanese potstickers. These little popper bites are made with the square wrappers.

To make the popper bites, you will need canned jalapenos. Chop jalapenos and you will need about 2 tablespoons.

Combine cream cheese, jalapenos, and smoked paprika (optional).

Place a spoonful of the cream cheese mixture in the center of a square wonton wrapper as shown in the picture above. Wet the edges of the wrapper using your fingertips. Roll lightly to wrap as shown in the picture above.

I didn’t bake these this time, but simply panfried them. But I think baking would work just as good. Just spray the wonton bites with cooking spray and bake at 375 degrees F for 8-10 minutes or until golden brown. If you prefer panfrying, heat oil in pan and cook the wonton bites until golden brown. Or of course, you can fry them, too! The choice is yours.
Jalapeno Popper Wonton Bites
Print
Ingredients
  • 4 ounces light cream cheese
  • 2 tablespoons canned jalapeno peppers, chopped
  • pinch of smoked paprika (optional)
  • 8 square wonton wrappers
  • oil/cooking spray
  • sweet chili sauce, to serve
Directions
  1. Combine cream cheese, jalapeno peppers, and paprika in small bowl and mix well.
  2. Place a spoonful of the mixture in the center of wonton wrapper. Wet all edges of the wrapper using fingertips. (Wet your fingertips with water.) Roll gently and seal.
  3. For baking; spray the prepared wontons with cooking spray and bake at 375 degrees F for 8-10 minutes, or until the wrappers are golden brown.
  4. For panfrying; heat about 2 tablespoons olive oil and fry the wontons both sides until golden brown.
  5. For frying; heat oil and deep fry until golden brown.
  6. Serve with sweet chili sauce if desired.